
Recuva is a free file recovery tool developed by Piriform. When a file is deleted from a drive, the data is not immediately erased — the space is simply marked as available. Recuva scans the drive for this data before it gets overwritten and allows you to restore it.
Before opening Recuva, stop using the drive you are trying to recover from. Every write operation — including saving new files, installing software, or even browsing the web if the drive is your system drive — reduces the chance of successful recovery.
Step 1 — Download and install Recuva
Download Recuva from the official Piriform website. The free version is fully functional — the paid version adds automatic updates and virtual hard drive support, which most users do not need.
Install Recuva to your main system drive (usually C:), not to the drive you plan to scan. Installing to the target drive risks overwriting the deleted files you want to recover.
Step 2 — Choose what to look for
When Recuva launches, a wizard walks you through the setup:
- File type — Select the category that matches what you lost (Pictures, Music, Documents, Video, Compressed) or choose All Files if you are unsure
- File location — Select the specific drive or folder, or choose I’m not sure to scan everything
If you know the filename or part of it, you can enter it in the filename field to narrow the results.
Step 3 — Run the scan
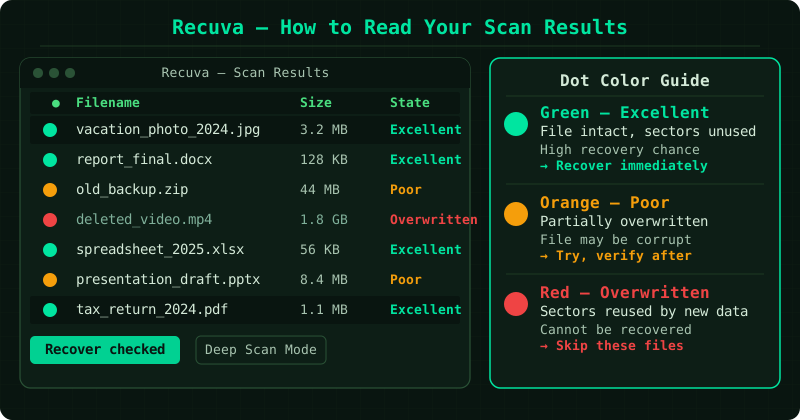
Click Start to begin the scan. A standard scan typically takes a few minutes. When it finishes, Recuva shows a list of found files with three pieces of information:
- Filename and path — where the file was before deletion
- Size — the file’s original size
- State — colour-coded recoverability:
- Green dot — Excellent condition, high recovery chance
- Orange dot — Poor condition, may be partially overwritten
- Red dot — Unrecoverable, data has been overwritten
Sort by State to prioritise green-dot files. Red-dot files are shown in case the filename itself is useful, but the contents are gone.
Step 4 — Enable Deep Scan if needed
If the standard scan does not find the files you are looking for, enable Deep Scan:
- Click Switch to advanced mode in the top right
- Go to Options > Actions
- Check Deep Scan (increases scan time)
- Close Options and run the scan again
Deep Scan ignores the file system entirely and reads the drive sector by sector, looking for file signatures (the identifying patterns at the start of each file type). This finds files even after a quick format or when the file system directory has been damaged. The trade-off is time — a deep scan on a large drive can take one to several hours.
Deep Scan recovers files without their original filenames. Files are named by type and sequence number (e.g., 0001234.jpg). The original folder structure is also lost.
Step 5 — Recover to a different drive
Select the files you want to recover by ticking their checkboxes. Click Recover and choose a destination folder — this must be on a different drive from the one being scanned. Recovering files to the same drive can overwrite other deleted files still waiting to be found.
Verify the recovered files open correctly before closing Recuva.
When Recuva will not help
Recuva reads data that is physically present on the drive. It cannot recover files when:
- The drive is not detected — a hardware failure (failed controller chip or damaged platters) requires professional recovery
- A full format was run — unlike a quick format, a full format overwrites actual data
- An SSD has processed TRIM — on most modern SSDs, deleted data is actively erased; Recuva may find nothing or very little
- Secure erase was used — data overwritten deliberately cannot be recovered by any software
Recuva and SSDs
Recuva works on SSDs, but results are less reliable than on traditional hard drives. The TRIM command, which most Windows systems send automatically to SSDs after file deletion, erases the underlying data shortly after deletion. On SSDs with TRIM enabled, deleted files may be gone within minutes. If you are attempting SSD recovery, the sooner you try, the better — though success is not guaranteed.
Frequently asked questions
Recuva found my file but it opens as blank or shows errors. Why? The file system directory entry was recovered (so Recuva could find the filename and location), but the data blocks have been partially or fully overwritten. The contents are gone. This is why stopping all writes immediately is the most important first step.
The file I want shows as red. Is there anything I can do? A red status means the data has been overwritten. Recuva cannot restore it. No other software can either — overwritten data does not exist on the drive anymore.
Can Recuva recover files from a memory card or USB drive? Yes. Recuva works on any drive that Windows can detect, including SD cards, USB flash drives, and external hard drives. The same rules apply — stop using the device as soon as you realise files are missing.