
An Ethernet connection that shows as connected in Windows — the cable icon appears in the system tray, Device Manager shows the adapter working — but produces no internet access is almost always a software configuration issue rather than a hardware failure.
According to Microsoft’s Windows Ethernet troubleshooting documentation, the most common causes are a corrupted IP or DNS configuration, a driver that needs updating, or a loose cable that appears connected but is not transmitting reliably.
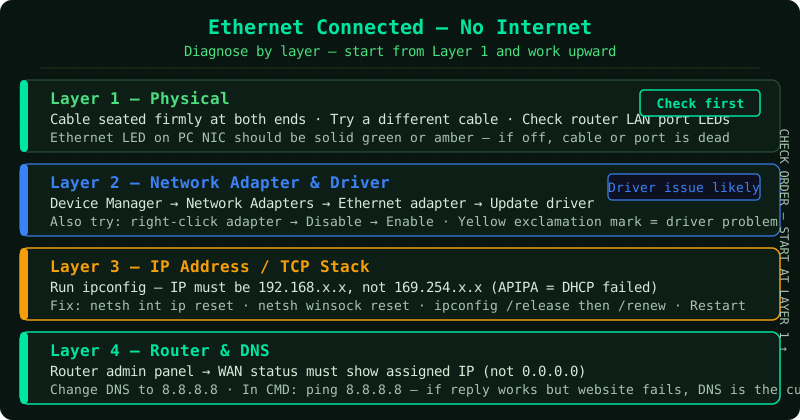
What causes Ethernet connected but no internet
The Windows status “Connected” for an Ethernet connection means the adapter detected a link signal from the router — it does not confirm that internet traffic is flowing. No internet errors occur when:
- IP address not assigned — the adapter shows
169.254.x.x(APIPA), which means DHCP failed and no valid IP was received from the router - DNS failure — the adapter has an IP but cannot resolve domain names
- Corrupted Winsock or TCP/IP stack — Windows cannot process network traffic correctly
- Router WAN issue — the router itself has no internet, affecting all connected devices
- Faulty cable or port — the cable is intermittently connected, causing a “Connected” status but no reliable data flow
- Outdated Ethernet driver — the driver does not correctly manage the adapter’s connection state
How to fix Ethernet connected but no internet
Step 1 — Check the cable and try a different port
A cable that appears connected — the plug is inserted, the adapter shows a link — can still be faulty. The RJ45 connector may have bent pins that pass a link signal but drop data packets.
- Unplug the Ethernet cable from the computer’s Ethernet port
- Unplug it from the router or switch
- Inspect both connectors for bent or damaged pins
- Check the cable for kinks, cuts, or tight bends — damage to the cable jacket often causes intermittent failure
- Plug the cable back in firmly at both ends — you should hear a click
- Try a different port on the router — some router ports fail while others work
- If you have a spare cable, swap it to eliminate the cable as the cause
Step 2 — Restart the router and reset the adapter
Restarting both the router and the Ethernet adapter simultaneously clears the DHCP lease and forces a fresh connection negotiation.
Restart the router:
- Unplug the router’s power cable
- Wait 30 seconds
While waiting, reset the Ethernet adapter:
- Right-click Start → Device Manager
- Expand Network adapters
- Right-click your Ethernet adapter (typically labelled “Gigabit Ethernet,” “Realtek PCIe,” “Intel Ethernet,” etc.)
- Select Disable device
Reconnect:
- Plug the router back in and wait for it to fully start (60–90 seconds)
- In Device Manager, right-click the Ethernet adapter → Enable device
Windows requests a new IP address from the router as the adapter enables. Check whether internet access is restored.
Step 3 — Reset the network stack
A corrupted Winsock or TCP/IP configuration prevents Windows from processing Ethernet traffic correctly — even when the adapter is connected and the router is working.
- Right-click Start → Terminal (Admin) or Command Prompt (Admin)
- Run each command in sequence:
netsh winsock reset
netsh int ip reset
ipconfig /flushdns
ipconfig /release
ipconfig /renew- Restart the computer after all commands complete
After restarting, check whether the Ethernet connection now has internet access.
To confirm the IP address was properly assigned after the restart:
- Open Command Prompt
- Run
ipconfig - Under your Ethernet adapter, the IPv4 Address should be in your network’s range (typically
192.168.1.xor192.168.0.x) — not169.254.x.x, which indicates DHCP failure
Step 4 — Change DNS servers
If the IP address is correctly assigned but internet access is still unavailable, the DNS servers provided by your ISP may be unresponsive.
- Go to Control Panel → Network and Sharing Center → Change adapter settings
- Right-click your Ethernet adapter → Properties
- Select Internet Protocol Version 4 (TCP/IPv4) → Properties
- Select Use the following DNS server addresses
- Enter:
- Preferred DNS server:
8.8.8.8 - Alternate DNS server:
8.8.4.4
- Preferred DNS server:
- Click OK → Close
Test internet access immediately after changing DNS — no restart is required for DNS changes to take effect.
Step 5 — Update or reinstall the Ethernet driver
An outdated or corrupted Ethernet driver can cause the adapter to report a connection while failing to pass traffic correctly.
Update the driver:
- In Device Manager, right-click the Ethernet adapter → Update driver → Search automatically for drivers
- If Windows finds and installs an update, restart and test
Reinstall the driver:
- Right-click the Ethernet adapter → Uninstall device
- If the option appears, check Attempt to remove the driver for this device
- Click Uninstall
- Restart the computer — Windows reinstalls the driver automatically
If Windows does not find a driver:
- Go to the computer manufacturer’s support site (Dell, HP, Lenovo, etc.)
- Search for your model and download the LAN or Ethernet driver
- Install it manually
How to verify the fix
- Open Command Prompt and run
ipconfig— confirm the Ethernet adapter shows a valid IPv4 address (not169.254.x.x) - Run
ping 8.8.8.8— you should see replies with response times, not “Request timed out” - Run
ping google.com— if8.8.8.8works butgoogle.comdoes not, DNS is still the issue - Open a browser and load a page
Frequently asked questions
Ethernet works on one computer but not another on the same cable. This confirms the cable and router port are working. The issue is with the second computer’s adapter, driver, or network configuration. Follow Steps 3–5 on the affected computer.
Ethernet stopped working after a Windows update. Windows updates occasionally replace OEM Ethernet drivers with generic versions. Download the Ethernet driver directly from the computer manufacturer’s support site (not Windows Update) and reinstall it.
Ethernet shows “Unidentified network” and no internet.
An “Unidentified network” status means Windows received either no IP address or an APIPA address (169.254.x.x). The router’s DHCP server is not responding. Restart the router, reset the adapter, and run the network reset commands in Step 3.