
A laptop that can see Wi-Fi networks in the list but fails to connect — showing errors like “Can’t connect to this network,” “Authentication failed,” or simply spinning without connecting — almost always has a driver, credential, or network stack issue rather than a hardware fault.
According to Microsoft’s Windows wireless connectivity troubleshooting documentation, the most common causes are corrupted saved network credentials, an incorrectly configured wireless adapter, and a damaged TCP/IP or Winsock configuration.
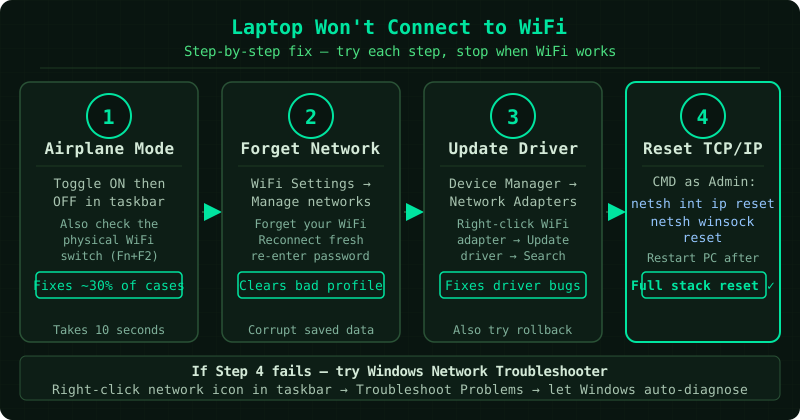
What causes a laptop to not connect to Wi-Fi
The specific failure mode matters:
- Can see the network but can’t connect — corrupted saved credentials, wrong password, or security type mismatch
- Wi-Fi networks not visible at all — the Wi-Fi adapter is disabled, Airplane Mode is on, or the driver is missing
- Connects briefly then drops — IP address conflict or DHCP issue (see the WiFi Keeps Disconnecting guide)
- “Can’t connect to this network” error — corrupted network profile stored in Windows
How to fix laptop not connecting to Wi-Fi
Step 1 — Check Airplane Mode and the physical Wi-Fi switch
Before any software troubleshooting, confirm the Wi-Fi hardware is enabled.
Airplane Mode:
- Check the system tray (bottom-right of the taskbar) — if the icon shows an airplane, Airplane Mode is active
- Click the network icon → turn off Airplane Mode
- Alternatively, go to Settings → Network & internet → confirm Airplane mode is toggled Off
Physical switch or keyboard shortcut: Many laptops have a dedicated Wi-Fi key or a function key combination to toggle wireless:
- Fn + F2 (common on HP, Lenovo)
- Fn + F8 (common on ASUS)
- A dedicated switch on the side of older laptops
Press the key combination once and check whether the Wi-Fi icon reappears in the system tray.
Step 2 — Forget the network and reconnect
Windows stores Wi-Fi credentials and security settings for each network. If these become corrupted — after a password change, router update, or Windows update — the connection fails without a clear error.
- Go to Settings → Network & internet → Wi-Fi → Manage known networks
- Find your Wi-Fi network in the list
- Click Forget
- Click the Wi-Fi icon in the system tray
- Select your network from the list and click Connect
- Enter the Wi-Fi password when prompted
This forces Windows to create a fresh network profile without any corrupted settings from the old one.
Step 3 — Disable and re-enable the Wi-Fi adapter
Toggling the adapter forces Windows to reinitialise the hardware connection and reapply the driver configuration — without requiring a full restart.
- Right-click the Start button → Device Manager
- Expand Network adapters
- Right-click your Wi-Fi adapter (look for words like “Wireless,” “Wi-Fi,” “802.11,” or a brand name like Intel, Realtek, Qualcomm)
- Select Disable device and confirm
- Wait 10 seconds
- Right-click the adapter again → Enable device
After the adapter re-enables, attempt to connect to your Wi-Fi network again.
Step 4 — Reset the Windows network stack
Corrupted Winsock or TCP/IP settings prevent Windows from negotiating the Wi-Fi connection — even if the adapter is working correctly.
- Right-click Start → Terminal (Admin) or Command Prompt (Admin)
- Run each command and press Enter after each:
netsh winsock reset
netsh int ip reset
ipconfig /flushdns
ipconfig /release
ipconfig /renew- Restart the computer — the Winsock reset only takes effect after a restart
After restarting, try connecting to the Wi-Fi network. This sequence fixes the majority of “Can’t connect to this network” errors that the troubleshooter cannot resolve.
Step 5 — Reinstall the Wi-Fi driver
If the adapter shows in Device Manager but cannot connect to any network (not just one), the driver is likely corrupted.
Uninstall the existing driver:
- In Device Manager, right-click your Wi-Fi adapter → Uninstall device
- If the option appears, check Attempt to remove the driver for this device
- Click Uninstall
- Restart the computer — Windows attempts to reinstall the driver automatically on restart
If Windows does not reinstall the driver:
- Go to your laptop manufacturer’s support site (Dell, HP, Lenovo, ASUS, etc.)
- Search for your laptop model
- Download the wireless/Wi-Fi driver for your Windows version
- Run the installer — it installs the manufacturer-optimised driver rather than the generic Windows version
How to verify the fix
- Click the Wi-Fi icon in the system tray — confirm your network appears and shows Connected
- Open a browser and load a page you have not visited recently
- Run
ping 8.8.8.8in Command Prompt — you should see replies, not timeouts
Frequently asked questions
Laptop connects to mobile hotspot but not home Wi-Fi. This confirms the Wi-Fi adapter is working. The issue is specific to the home network. The most likely cause is a corrupted network profile (Step 2) or a router security mismatch. Check the router’s security settings — if it uses WPA3, try switching to WPA2 on the router to see if the laptop connects.
Laptop shows “No Wi-Fi networks found” after Windows update. A Windows update can replace the manufacturer’s Wi-Fi driver with a generic one that does not support all adapter features. Download the Wi-Fi driver from the laptop manufacturer’s support page and reinstall it. Do not use Windows Update for the Wi-Fi driver — it often installs a less compatible version.
“Authentication failed” when trying to connect to Wi-Fi. The password is incorrect, or the router’s security type changed. Forget the network (Step 2), double-check the Wi-Fi password (check the router label), and reconnect. If the password is correct but authentication still fails, check the router’s security setting — change it to WPA2-Personal (AES) if it is set to WPA3 or mixed mode.