
The router admin panel — also called the router settings page or router dashboard — is accessed through any web browser using the router’s local IP address. According to NETGEAR’s documentation, the most common mistake is typing the router’s address into a search engine instead of the browser’s address bar, which takes you to a web search instead of the router login page.
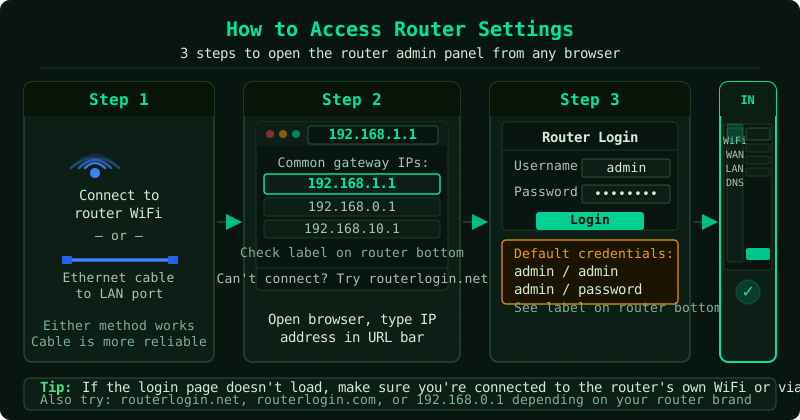
Finding your router’s admin address
The admin address is the router’s local IP address on your home network. Every router has one, and it is almost always one of these:
| Router Brand | Admin Address | Also try |
|---|---|---|
| NETGEAR | 192.168.1.1 or routerlogin.net | — |
| TP-Link | 192.168.0.1 or tplinkwifi.net | 192.168.1.1 |
| ASUS | 192.168.1.1 or router.asus.com | 192.168.0.1 |
| Linksys | 192.168.1.1 or myrouter.local | — |
| D-Link | 192.168.0.1 or dlinkrouter.local | 192.168.1.1 |
| Cisco | 192.168.1.1 | 192.168.15.1 |
| Belkin | 192.168.2.1 | — |
The exact address is always printed on the label on the bottom or back of the router.
Find the address automatically (Windows)
- Open Command Prompt (search
cmdin the Start menu) - Type
ipconfigand press Enter - Find the section for your active network connection (Ethernet or WiFi)
- The Default Gateway line shows the router’s admin address
Default Gateway . . . . . . . . : 192.168.1.1Find the address automatically (Mac)
- Open Terminal (Finder → Applications → Utilities → Terminal)
- Type
netstat -nr | grep defaultand press Enter - The first result shows the router’s address
How to access your router settings
Step 1 — Connect to the router’s network
You must be connected to the router — either via Ethernet cable or the router’s WiFi network — to reach the admin panel. You cannot access it over the internet or from a different network.
If you are connected to a WiFi extender or a different router, you may be accessing a different device’s admin panel, not your main router.
Step 2 — Open the router login page
- Open a web browser — Chrome, Edge, Firefox, or Safari all work
- Click the address bar at the top of the browser (where URLs appear)
- Type the router address — for example:
192.168.1.1- Do not search for it — type it directly in the address bar
- Do not add
www.before the address - Press Enter
- A router login page appears
If you see “This site can’t be reached” or an error:
- Try
http://192.168.1.1(with thehttp://prefix — some browsers block plain IP addresses) - Try the alternative address (192.168.0.1 if 192.168.1.1 failed, or vice versa)
- Confirm you are connected to the router’s network, not a mobile hotspot or VPN
Step 3 — Log in with admin credentials
Enter the admin username and password:
Default credentials (printed on the router label):
- Username: usually
admin - Password: usually
admin,password,1234, or a unique code on the label
If the default credentials do not work: The password was changed by someone previously. Your options:
- Try passwords you may have set in the past
- Check if the password is saved in your browser’s saved passwords
- Reset the router: hold the Reset button on the back for 10 seconds — this restores factory defaults including the original admin password (all settings will be lost)
Step 4 — Navigate to the setting you want to change
After logging in, the admin panel home screen typically shows a status overview. Use the navigation menu to find what you need:
| Section | What you find there |
|---|---|
| Wireless / WiFi Settings | Network name (SSID), WiFi password, security type, channel |
| WAN / Internet | Connection type (DHCP/PPPoE), IP address, DNS servers |
| LAN Settings | Local IP range, DHCP server settings |
| Advanced | Port forwarding, DMZ, firewall rules, QoS |
| Administration | Admin password, firmware update, backup/restore settings |
| Parental Controls | Website blocking, device scheduling |
Common router settings to change
Change WiFi name and password:
Wireless Settings → change SSID and Password → Apply
Change DNS servers:
WAN Settings or Internet Settings → DNS → enter 8.8.8.8 (Google) or 1.1.1.1 (Cloudflare)
Update firmware:
Administration → Firmware Update → Check for Updates → Install
Set up guest network:
Wireless Settings → Guest Network → Enable → set a separate SSID and password
Frequently asked questions
The browser says the connection is not private when opening 192.168.1.1. This is normal. Some routers use HTTPS with a self-signed certificate that browsers flag as untrusted. Click Advanced → Proceed to 192.168.1.1 (or the equivalent in your browser). This is your local router — the warning does not mean it is unsafe.
I can reach the login page but the admin password is wrong. The password was changed. If you do not remember it, hold the Reset button on the back of the router for 10 seconds. The router restores all factory defaults, including the original admin password. You will need to reconfigure the WiFi name and password.
The router admin page loads but all changes say “Insufficient permissions.”
Some routers have a separate read-only user account and an admin account. Log out and log back in using the admin username specifically — not a custom username that may have limited permissions.