
A router connects to the internet through a modem — the modem handles the ISP connection, and the router shares it with your devices. According to NETGEAR’s home networking documentation, the three most common causes of a router not connecting to the internet are: the Ethernet cable is in the wrong port, the modem has not restarted after the router was connected, or the WAN connection type in the router is set incorrectly.
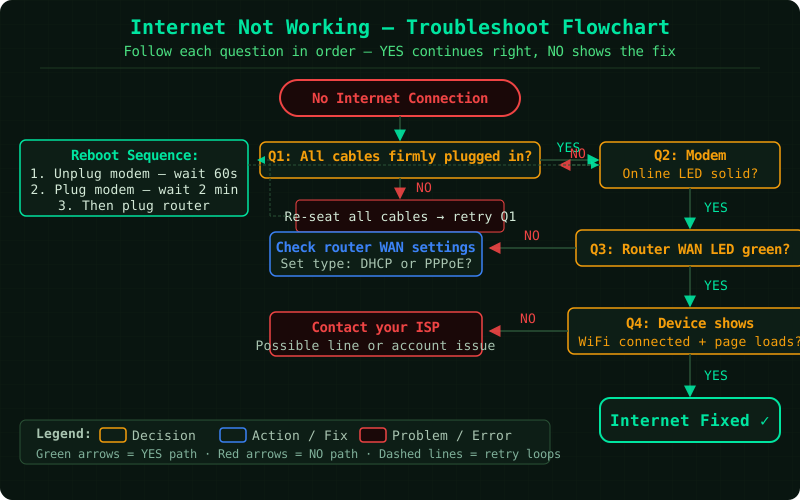
Understanding how the router gets internet
The internet connection path:
- ISP sends signal (cable, fiber, or DSL) through the cable in your wall
- Modem receives the ISP signal and converts it to a standard Ethernet signal
- Router receives the Ethernet signal from the modem via the WAN port, then distributes internet access to all devices via WiFi and LAN ports
The router itself does not connect to the internet directly — it always goes through the modem. If the modem has no internet, the router has no internet regardless of settings.
How to connect a router to the internet
Step 1 — Verify the modem is online first
Before troubleshooting the router, confirm the modem is working:
- Look at the modem’s status LEDs:
OnlineorInternetLED — should be solid greenDS/US(Downstream/Upstream) LED — should be solid
- If the Online LED is blinking or off:
- The modem is not connected to your ISP
- Restart the modem: unplug power, wait 30 seconds, plug back in
- Wait 2 minutes for the modem to reconnect to the ISP
- If still offline, contact your ISP — the issue is on their network
Only proceed to router setup once the modem’s Online LED is solid.
Step 2 — Connect the Ethernet cable to the correct ports
This is the most common hardware mistake:
Modem side:
- The modem has one Ethernet port — usually labelled
LAN,ETH, orEthernet - This is separate from the coaxial, fiber, or phone cable input
Router side:
- The WAN port — labelled
WAN,Internet, orINTERNET - Usually a different color from the four LAN ports (often yellow or blue)
- Located separately from the LAN ports
Wrong: Ethernet cable from modem → router LAN port (ports 1-4) Correct: Ethernet cable from modem → router WAN/Internet port
Plug in firmly — both ends should click. After connecting:
Step 3 — Restart both devices in order
Sequence matters:
- Power off the router (unplug or press power button)
- Power off the modem (unplug)
- Wait 30 seconds
- Power on the modem — wait 60–90 seconds until the Online LED is solid
- Power on the router — wait 60 seconds
The router’s WAN or Internet LED should turn green within 60 seconds of powering on. This indicates the modem assigned the router a valid IP address.
Step 4 — Set the correct WAN connection type
The router must be configured with the correct connection type for your ISP:
- Log in to the router admin panel (
192.168.1.1or192.168.0.1) - Go to WAN Settings, Internet Settings, or Basic Setup
- Find Internet Connection Type or WAN Connection Type
| ISP Type | Correct WAN Setting |
|---|---|
| Cable internet (Xfinity, Spectrum, Cox) | DHCP or Automatic |
| Fiber internet (most providers) | DHCP or Automatic |
| DSL internet (AT&T, CenturyLink) | PPPoE |
| Business/static IP | Static IP |
For PPPoE (DSL): Your ISP provides a username and password — enter them in the PPPoE fields. This is different from your WiFi password.
Click Save or Apply. The router reconnects using the new settings.
Step 5 — Verify the WAN IP address
After saving settings, confirm the router received a valid internet IP:
-
In the router admin panel, go to WAN Status, Internet Status, or Router Status
-
The WAN IP Address field should show a valid IP:
- ✓ Valid: any IP starting with a number other than
0,169, or192.168 - ✗
0.0.0.0— router has no WAN connection (cable or modem issue) - ✗
169.254.x.x— APIPA address, router is not receiving DHCP from modem
- ✓ Valid: any IP starting with a number other than
-
The Default Gateway and DNS fields should also show valid addresses
Step 6 — Test internet access
ping 8.8.8.8Open Command Prompt (Windows) or Terminal (Mac) and run the above command. Consistent replies mean internet access is working. Timeouts indicate the connection is still not established.
Frequently asked questions
The WAN LED turns on but devices still have no internet.
The router is connected but may have incorrect DNS settings. Log into the admin panel, go to WAN Settings, and set DNS to 8.8.8.8 (primary) and 8.8.4.4 (secondary). Save and test again.
The router gets internet when directly connected to one device but not through WiFi. The router’s DHCP server may not be assigning IP addresses to WiFi devices. Log into the admin panel and go to LAN Settings → DHCP Server — confirm it is enabled. Restart the router after enabling it.
The WAN IP shows a valid address but the router cannot reach any website.
Run ping 8.8.8.8 — if this works but ping google.com fails, the issue is DNS. The DNS server addresses in the router settings are unreachable. Change them to 8.8.8.8 and 8.8.4.4 in the WAN settings.
The modem is online but the router keeps getting 0.0.0.0 as WAN IP. The modem may be caching the old router’s MAC address. Some ISP modems take 10–15 minutes to release the old MAC address. Wait 15 minutes after the modem restart before powering on the new router. Alternatively, in the router admin panel, find a MAC Address Clone option and enter a different MAC address.