
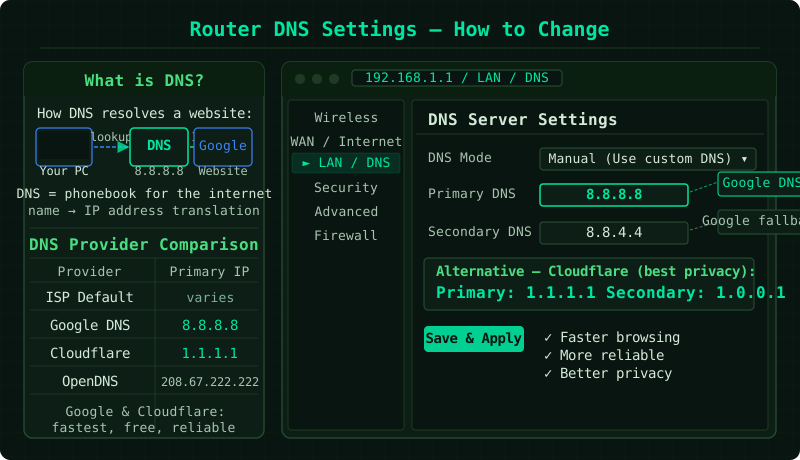
DNS (Domain Name System) servers translate website names like google.com into the IP addresses computers use to connect. Your router uses DNS servers assigned by your ISP by default — but these are often slower and less reliable than public alternatives. According to Google’s Public DNS documentation, switching to a faster DNS server reduces the time websites take to load, particularly the initial connection delay.
Why change your router’s DNS settings
ISP DNS limitations:
- Often located far from users geographically, adding latency
- Can experience outages that break internet access even when your connection is working
- Some ISPs redirect failed DNS lookups to advertising pages
Benefits of Google (8.8.8.8) or Cloudflare (1.1.1.1):
- Globally distributed servers — typically faster response times
- Higher uptime and reliability than ISP DNS
- No redirection of mistyped domains to advertising pages
- Free with no registration required
Changing DNS on the router vs. individual devices: Changing DNS on the router applies to every device on your network automatically — phones, laptops, TVs, smart home devices — without configuring each one individually.
DNS server options
| Provider | Primary DNS | Secondary DNS | Known for |
|---|---|---|---|
| Google Public DNS | 8.8.8.8 |
8.8.4.4 |
Speed, reliability |
| Cloudflare | 1.1.1.1 |
1.0.0.1 |
Privacy, speed |
| OpenDNS | 208.67.222.222 |
208.67.220.220 |
Parental controls |
| Quad9 | 9.9.9.9 |
149.112.112.112 |
Security, blocks malicious domains |
How to change DNS settings on your router
Step 1 — Log in to the router admin panel
- Open any browser
- Type 192.168.1.1 in the address bar (or 192.168.0.1 for ASUS/D-Link)
- Log in with your admin credentials (on the router label)
If you cannot reach the admin panel, see How to Access Your Router Settings.
Step 2 — Find the WAN DNS settings
The DNS settings location varies by router brand:
| Router Brand | DNS Setting Location |
|---|---|
| NETGEAR | Internet → Domain Name Server (DNS) Address |
| TP-Link | Network → WAN → DNS Server |
| ASUS | WAN → Internet Connection → WAN DNS Setting |
| Linksys | Connectivity → Internet Settings → DNS |
| D-Link | Setup → Internet → Manual DNS |
Look for fields labelled:
- Primary DNS Server (also: DNS Server 1, Preferred DNS)
- Secondary DNS Server (also: DNS Server 2, Alternate DNS)
If you see Get DNS Server Automatically or Use ISP DNS, there should be a toggle to switch to manual DNS entry.
Step 3 — Enter the new DNS addresses
Clear the existing entries and type:
Google Public DNS:
- Primary DNS:
8.8.8.8 - Secondary DNS:
8.8.4.4
Cloudflare DNS:
- Primary DNS:
1.1.1.1 - Secondary DNS:
1.0.0.1
Enter these exactly — a single digit error means the DNS server cannot be reached and internet browsing will fail.
Click Save or Apply.
Step 4 — Flush DNS cache on your devices
After changing the router DNS, cached lookups on each device still point to the old DNS server temporarily. Flush the cache to apply the new settings immediately:
Windows:
- Open Command Prompt (search
cmdin Start) - Run:
ipconfig /flushdns - You should see: “Successfully flushed the DNS Resolver Cache”
Mac:
- Open Terminal
- Run:
sudo dscacheutil -flushcache; sudo killall -HUP mDNSResponder - Enter your Mac password when prompted
Without flushing: the new DNS takes effect automatically within 1–8 hours as cached entries expire.
How to verify the DNS change
On Windows:
- Open Command Prompt
- Run:
nslookup google.com - The output shows which DNS server was used:
If you seeServer: dns.google Address: 8.8.8.88.8.8.8or1.1.1.1as the server address, the change is working.
Speed comparison:
- Open Command Prompt
- Run:
nslookup google.com 8.8.8.8— note the response time - Run:
nslookup google.com— note the response time using your current DNS
Frequently asked questions
After changing DNS, some websites stopped working.
A typo in the DNS address causes all lookups to fail. Log back into the router admin panel and verify the addresses match exactly: 8.8.8.8 and 8.8.4.4. A single digit error breaks DNS resolution for all devices.
My router does not have a WAN DNS option. Some ISP-provided routers lock the WAN DNS settings. In this case, change DNS on each device individually: on Windows, go to Network adapter settings → IPv4 Properties → set DNS manually. On Android/iOS, change DNS in the WiFi network’s advanced settings.
Can I use different DNS providers for primary and secondary?
Yes — for example, 8.8.8.8 (Google) as primary and 1.1.1.1 (Cloudflare) as secondary. The secondary is only used if the primary is unreachable, so mixing providers is a valid redundancy strategy.
Does changing DNS affect speed? Yes, noticeably for the initial connection to websites. DNS resolution happens before every new connection — faster DNS means websites start loading sooner. The actual download speed of page content is not affected by DNS.