
Router configuration controls who can use your network, how fast it performs, and how secure it is. According to NETGEAR’s official documentation, the factory default settings — default SSID, default admin password, and mixed security mode — leave your network less secure and performing below its potential.
Accessing the router admin panel
All router configuration is done through the admin panel — a web interface built into the router.
- Connect your computer to the router via Ethernet or WiFi
- Open any web browser
- Type the router’s admin address directly in the address bar (do not search):
- 192.168.1.1 — NETGEAR, TP-Link, Linksys, most routers
- 192.168.0.1 — ASUS, D-Link, some others
- The exact address is printed on the label on the bottom of the router
- Enter the admin username and password from the router label
- If the credentials have been changed and you do not know them, hold the router’s Reset button for 10 seconds — this restores factory defaults
How to configure a WiFi router
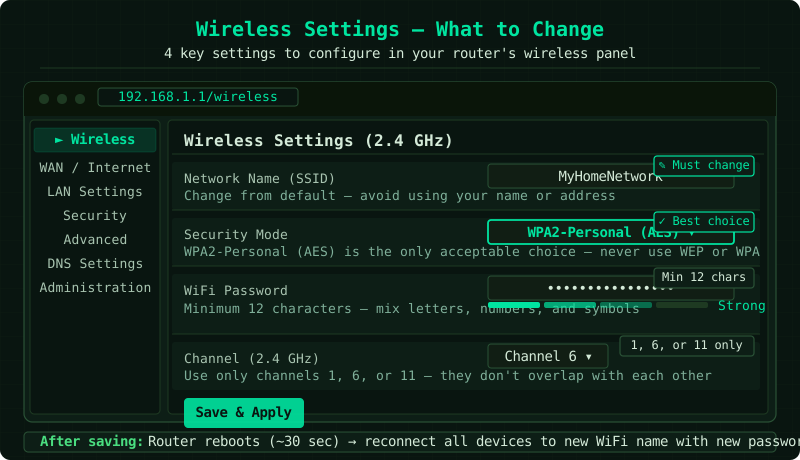
Step 1 — Change the WiFi network name (SSID)
The default SSID often reveals your router’s brand and model, which helps attackers know which vulnerabilities to try.
- In the admin panel, go to Wireless or WiFi Settings
- Find the Network Name (SSID) field
- Change it to a name you choose — something memorable but not personally identifying
- If your router is dual-band (both 2.4 GHz and 5 GHz), configure both:
- Give each band a different name, e.g.
HomeNetwork_2GandHomeNetwork_5G - This lets you manually choose which band each device connects to
- Give each band a different name, e.g.
- Click Save
Step 2 — Set the security type and WiFi password
Security type determines the encryption method used to protect your wireless traffic.
| Security Type | Recommendation |
|---|---|
| WPA3 | Best — use if all devices support it (2019+) |
| WPA2-Personal (AES) | Recommended for most homes |
| WPA/WPA2 Mixed | Acceptable if you have older devices |
| WEP | Never use — easily broken |
| None/Open | Never use — no encryption |
- In Wireless Settings, find Security Mode or Authentication
- Select WPA2-Personal (AES) for maximum compatibility
- Enter a strong Network Password:
- Minimum 12 characters
- Mix uppercase, lowercase, numbers, and symbols
- Avoid dictionary words or predictable patterns
- Click Save — all currently connected devices will need to re-enter the new password
Step 3 — Choose the optimal WiFi channel
Channel congestion from neighbouring networks is one of the most common causes of slow WiFi.
For the 2.4 GHz band:
- Use channel 1, 6, or 11 only — these are the three non-overlapping channels
- If neighbours use channel 6 (the most common default), try channel 1 or 11
For the 5 GHz band:
- Channels 36, 40, 44, 48 are the most stable (no Dynamic Frequency Selection restrictions)
- The 5 GHz band has shorter range but significantly higher speeds
To check which channel to use:
- On Windows, open Command Prompt and run
netsh wlan show networks mode=bssid - This lists nearby networks and their channels — pick a channel that few or no neighbours use
In the admin panel, go to Wireless → Advanced Settings and change the Channel setting. Alternatively, set it to Auto — modern routers select the least congested channel on boot.
Step 4 — Configure the 2.4 GHz and 5 GHz bands
2.4 GHz band:
- Longer range (reaches further through walls)
- Lower speeds (max ~150–600 Mbps depending on standard)
- More interference from neighbours and household devices
- Best for: smart home devices, devices far from the router
5 GHz band:
- Shorter range (weakens faster through walls)
- Higher speeds (max ~1300 Mbps+)
- Less interference
- Best for: laptops, phones, streaming devices near the router
Step 5 — Change the router admin password
The default admin password is printed on the router label — anyone who sees your router can log into the admin panel.
- Go to Administration, System, or Advanced in the admin panel
- Find Admin Password, Login Password, or Management Password
- Enter a new, strong password (different from your WiFi password)
- Save and log back in with the new credentials
Router configuration checklist
After completing configuration, verify:
- SSID changed from default
- WiFi password is strong (12+ characters)
- Security mode is WPA2 or WPA3
- Channel is set (not left on the default channel 6 for 2.4 GHz)
- Admin password changed from factory default
- Firmware updated (check under Administration → Firmware Update)
Frequently asked questions
My devices disconnected after I changed the WiFi password. Expected — any change to the SSID or password requires all devices to reconnect. Go to WiFi settings on each device, forget the old network, and reconnect with the new password.
What is the difference between 2.4 GHz and 5 GHz? Both are WiFi frequency bands. The 2.4 GHz band has better range but lower speed and more interference. The 5 GHz band has shorter range but much higher speeds and less congestion. Connect phones and laptops near the router to 5 GHz; smart home devices and devices in distant rooms to 2.4 GHz.
Should I enable guest network? Yes, if visitors regularly use your WiFi. The guest network isolates visitor traffic from your main network — visitors cannot access your shared files, printers, or other local devices. Set it up under Wireless → Guest Network in the admin panel.