
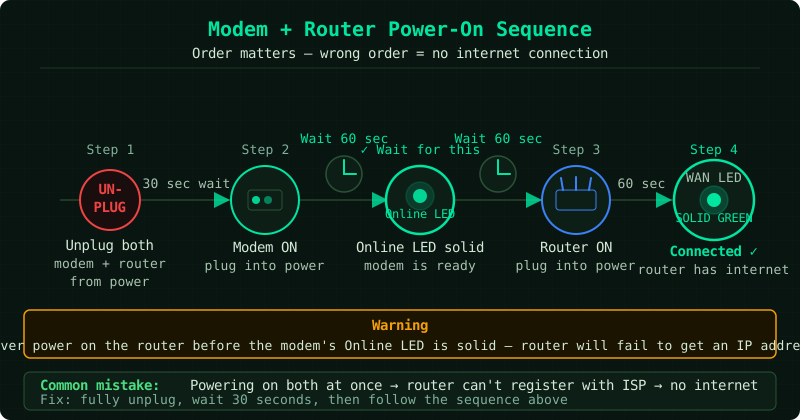
Setting up a modem and router together involves two separate processes: getting the modem online with your ISP, then connecting the router to share that connection. According to NETGEAR’s networking documentation, the most common mistake is connecting the router before the modem has fully registered with the ISP — which causes the internet connection to fail even when all cables are correctly installed.
Understanding the two-device setup
| Device | Role | Connects to |
|---|---|---|
| Modem | Converts ISP signal to Ethernet | Wall (ISP cable) + Router |
| Router | Shares connection, creates WiFi | Modem + All home devices |
Note: If your ISP gave you a single combined device, it is a gateway (modem-router combo) — you only need one device, not two. This guide covers separate modem and router devices.
How to set up a modem and router together
Step 1 — Activate the modem with your ISP
A modem must be registered with your ISP before it can connect to the internet. This is done using the modem’s MAC address — a unique identifier printed on the label on the modem.
For cable internet (Xfinity, Spectrum, Cox, Optimum):
- Log into your ISP’s account portal
- Look for Manage Equipment, My Devices, or Activate Equipment
- Enter the modem’s MAC address (labelled CM MAC or HFC MAC on the modem)
- Follow the activation steps — takes 5–15 minutes
For fiber or DSL: Your ISP may need to activate the line remotely. Call the ISP support line and provide the modem model and MAC address. They activate the line from their end.
Do not skip this step — an unregistered modem cannot get online regardless of how correctly everything else is connected.
Step 2 — Connect the ISP cable to the modem
- Locate the cable coming from your wall — this is your ISP’s signal:
- Coaxial (round, copper pin center) — for cable internet
- RJ11 (phone jack, narrow) — for DSL
- SC/APC or LC optical connector — for fiber
- Connect this cable to the input port on the modem (labelled
Cable In,DSL, orFiber In) - Plug the modem into a power outlet
- Wait 2–3 minutes for the modem to connect to your ISP
Modem LEDs to watch:
Power— solid green when powered onDS/US(Downstream/Upstream) orCable— solid when connected to ISPOnlineorInternet— solid green means successfully connected to ISP ✓
Do not proceed until the Online LED is solid.
Step 3 — Connect the modem to the router
- Take the Ethernet cable (usually included with the router)
- Modem end: plug into the modem’s Ethernet/LAN port — the single Ethernet port on the modem body (not the coax input)
- Router end: plug into the router’s WAN port — labelled
WAN,Internet, or a distinct color (often yellow or blue)
After plugging in, power on the router.
Step 4 — Wait for the router to get an IP address
- Power on the router and wait 90 seconds
- Watch the router’s WAN or Internet LED:
- Solid green — modem assigned the router an IP address — connection successful ✓
- Blinking amber — still negotiating
- Solid amber/red — failed to get IP address (see FAQ)
- If the WAN LED does not turn green within 2 minutes, restart the modem:
- Unplug modem power, wait 30 seconds, replug
- Wait 60 seconds for modem to reconnect to ISP
- The router should then receive an IP address
Step 5 — Access the router admin panel and set up WiFi
- Connect your laptop or phone to the router’s default WiFi network:
- Network name and temporary password are on the label on the bottom of the router
- Open a browser and go to 192.168.1.1 or 192.168.0.1 (check the router label)
- Log in with the default admin credentials (on the label — typically
admin/adminoradmin/password) - The Setup Wizard launches — follow its steps:
- Internet Connection Type: usually set automatically (DHCP for cable, PPPoE for DSL — your ISP tells you which)
- WiFi Network Name (SSID): change from default
- WiFi Password: set a strong password (12+ characters)
- Admin Password: change from default
- Apply settings — router restarts with the new configuration
How to verify the full setup
After the router restarts:
- Internet LED on modem: solid green
- WAN LED on router: solid green
- WiFi: your new network name appears on connected devices
- Browser test: open any website — pages load normally
- Command Prompt: run
ping 8.8.8.8— get replies with response times
Frequently asked questions
The modem online LED is solid but the router WAN LED is amber. Restart the modem without changing anything (unplug 30 seconds, replug). Some modems cache the MAC address of the previous device and take up to 2 minutes to accept the new router. Give the router 2 minutes after the modem fully reboots.
The ISP says my modem is not compatible. ISPs maintain a list of approved modem models. Check your ISP’s compatibility list (usually on their website under Approved Modems or Equipment). If your modem is not listed, you must use the ISP’s provided equipment or purchase a compatible model.
Do I need a modem if my ISP provided an all-in-one gateway? No. An ISP gateway (Arris, Netgear CM1000, Motorola MB8611) combines the modem and router into one device. You only need a separate router if you want to replace the ISP’s gateway router with a better one.