
Setting up a new WiFi router takes under 15 minutes when you follow the steps in the right order. According to NETGEAR’s official installation documentation, the most common setup mistakes are plugging the Ethernet cable into the wrong port, skipping the admin panel step, and leaving the default password unchanged.
What you need before starting
- WiFi router (new or factory-reset)
- Modem — provided by your ISP or purchased separately
- Ethernet cable — to connect the modem and router (usually included with the router)
- ISP connection — the coaxial or fiber cable from your wall that connects to the modem
If your ISP provided a combined modem-router (gateway) device, see the Router and Modem Setup guide instead.
How to set up a WiFi router
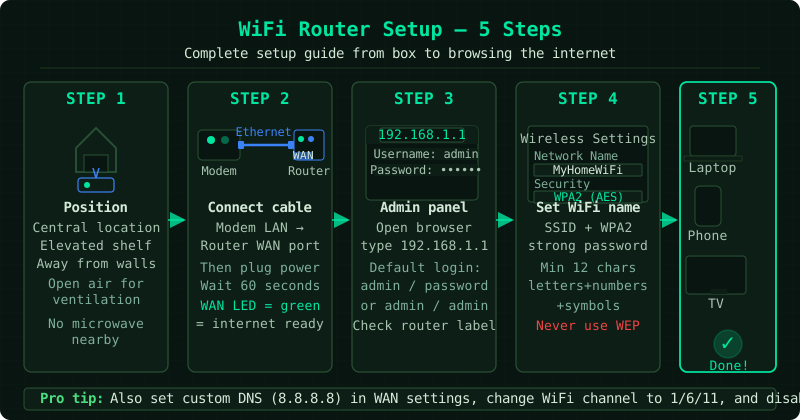
Step 1 — Position the router and connect power
Router placement directly affects signal strength and coverage.
Where to place it:
- A central location in your home — the signal radiates outward in all directions
- An elevated surface (shelf or desk) — not on the floor
- Away from thick walls, microwaves, baby monitors, and cordless phones
- Not inside a cabinet or entertainment unit — heat buildup reduces performance
Connect the power adapter to the router and plug it into the wall. Turn the router on using the power button if it has one. Wait 60 seconds for it to fully boot — the LEDs on the front panel will stabilise when it is ready.
Step 2 — Connect the router to your modem
This is the most critical physical step. Using the Ethernet cable:
- Plug one end into the modem’s LAN or Ethernet port (a single port on the modem, separate from the coax/phone cable input)
- Plug the other end into the router’s WAN port — this is usually:
- Labelled WAN, Internet, or INTERNET
- A different color from the four LAN ports (often blue or yellow)
- Located separately from the other ports
The router’s WAN LED or Internet LED should light up within 30 seconds. A solid or blinking light confirms the modem and router are communicating.
Step 3 — Connect your computer to the router
For initial setup, a wired connection is more reliable than WiFi:
- Plug an Ethernet cable from any LAN port on the router into your computer
- If your computer does not have an Ethernet port, connect to the router’s default WiFi network — the network name and temporary password are printed on the label on the bottom or back of the router
The default network name typically looks like NETGEAR-xxxx, TP-Link_xxxx, or ASUS_xxxx.
Step 4 — Access the router admin panel
- Open any web browser (Chrome, Edge, Firefox)
- Type the router’s admin address in the address bar — do not search for it, type it directly:
- 192.168.1.1 — most common (NETGEAR, TP-Link, Linksys)
- 192.168.0.1 — ASUS, D-Link, some others
- Check the label on the bottom of your router if neither works
- A login page appears — enter the default credentials from the router label:
- Username: typically
admin - Password: typically
admin,password, or printed on the label
- Username: typically
- On first login, most routers launch a Setup Wizard automatically — follow its prompts
Step 5 — Set your WiFi name and password
This is the most important security step.
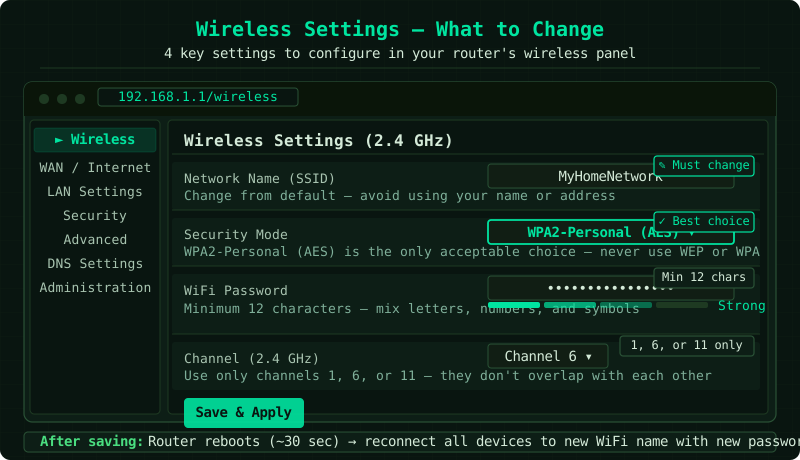
- Navigate to Wireless or WiFi Settings in the admin panel
- Network Name (SSID): Change from the default to a name you will recognise — avoid using your name or address
- Security: Select WPA2-Personal (AES) — the most widely compatible secure option. If all your devices are recent (2019 or newer), WPA3 provides better security
- Password: Set a strong password — at least 12 characters with letters, numbers, and a symbol
- Click Save or Apply
Your router will briefly restart to apply the new settings. Reconnect your devices using the new network name and password.
Step 6 — Connect your devices
- On each phone, laptop, or tablet, open WiFi Settings
- Select your new network name from the list
- Enter the password you just set
- Verify internet access by opening a browser
For best performance:
- Connect desktop computers, smart TVs, and game consoles via Ethernet cable to the router’s LAN ports
- Reserve WiFi bandwidth for devices that cannot use cables
How to verify the setup
- Open a browser on any device and load a page
- Open Command Prompt (Windows) or Terminal (Mac) and run
ping 8.8.8.8— you should see replies, not timeouts - Check the router admin panel — the WAN Status or Internet Status section should show a valid external IP address
Frequently asked questions
The router’s WAN LED is not lighting up. Check that the Ethernet cable is plugged into the WAN/Internet port on the router, not one of the LAN ports. Also confirm the modem is powered on and fully booted. Try a different Ethernet cable — cable faults are common.
I can connect to the router but have no internet. The modem may not be recognising the new router. Restart the modem (unplug for 30 seconds, replug), then restart the router. Some ISPs require the modem to learn the new router’s MAC address — a modem restart forces this.
I cannot reach 192.168.1.1. Ensure your computer is connected to the router (not a different network). Some routers use a different address — check the label on the router bottom. If still unreachable, hold the router’s reset button for 10 seconds to restore factory defaults.
Should I change the router’s admin password? Yes — immediately after setup, go to Administration or Advanced in the admin panel and change the admin login password. Leaving it at the default exposes your router to anyone on your local network.