
A wireless router creates the WiFi network that all devices in your home connect to. According to NETGEAR’s router installation documentation, placement and physical connection to the modem are the two factors that most affect wireless performance — configuration in the admin panel matters less than getting these two steps right.
What you need
| Item | Purpose |
|---|---|
| Wireless router | Creates the WiFi network |
| Modem | Connects to your ISP (cable, fiber, or DSL) |
| Ethernet cable | Connects modem to router (included with router) |
| ISP service | Active internet subscription |
How to set up a wireless router
Step 1 — Choose the right location
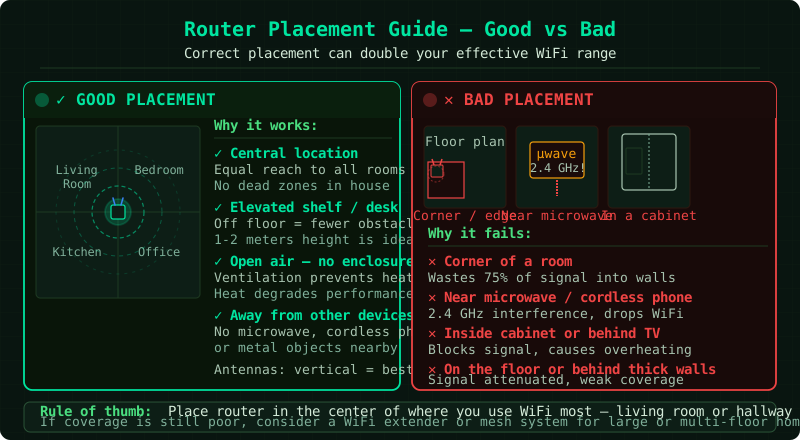
Router placement is the single biggest factor in WiFi coverage.
Best placement:
- Central to the area you want to cover — the signal radiates in all directions, so center the router to cover the whole floor plan
- Elevated — on a shelf at 1–2 meters height. Signal travels outward and slightly downward; placing the router on the floor wastes half the signal into the ground
- In the open — not inside cabinets, closets, or entertainment units
Avoid placing near:
- Microwave ovens (emit 2.4 GHz radiation during use)
- Cordless phone bases (2.4 GHz)
- Baby monitors (2.4 GHz)
- Thick concrete or brick walls (major signal blockers)
- Metal surfaces and aquariums (reflect/absorb signal)
Step 2 — Connect the router to the modem
Before connecting any cables:
- Power off the modem — unplug it or press its power button
- If replacing an old router, disconnect it from the modem
Connect:
- Take the Ethernet cable (included in the router box, or any Cat 5e/Cat 6 cable)
- Plug one end into the modem’s Ethernet port — this is the single Ethernet port on the modem, separate from the coaxial/phone/fiber cable input
- Plug the other end into the router’s WAN port — labelled
WAN,Internet, orINTERNET. It is usually a distinct color or location from the 4 LAN ports
Power on in order:
- Modem first — plug in, wait 60 seconds for Online LED to become solid
- Router second — plug in, wait 60 seconds for it to fully boot
The router’s WAN LED or Internet LED should turn green — this confirms the modem assigned the router an IP address.
Step 3 — Access the router admin panel
- Connect your device to the router’s default WiFi network:
- Network name and password are on the label on the bottom/back of the router
- Open a web browser
- Type the router admin address in the address bar (not the search bar):
192.168.1.1— most routers (NETGEAR, TP-Link, Linksys, Belkin)192.168.0.1— ASUS, D-Link, some others192.168.10.1— some TP-Link and Tenda models
- Enter the admin credentials from the router label
- A Setup Wizard launches on first login for most routers — follow it
Step 4 — Configure WiFi settings
In Wireless Settings or WiFi Settings:
Network Name (SSID):
- Change from the factory default to a name you choose
- Avoid using your name, address, or ISP name in the network name
- For dual-band routers, set different names for 2.4 GHz and 5 GHz (e.g.,
HomeNet_2GandHomeNet_5G)
Security and Password:
- Security Type: Select
WPA2-Personal (AES)— supported by all devices made after 2006 - Password: At least 12 characters, mix of letters, numbers, and symbols
- Never use WEP or leave WiFi open (unsecured)
Channel:
- 2.4 GHz: Set to channel 1, 6, or 11 — the only three non-overlapping channels
- 5 GHz: Channels 36–48 are the most stable
- Or leave on Auto — the router selects the least congested channel
Click Save or Apply and wait for the router to restart.
Step 5 — Secure the router admin panel
Before finishing setup:
- Go to Administration or Advanced Settings
- Change the Admin Password from the factory default — the default is printed on the router label, making it accessible to anyone who can see your router
- Save the new admin password somewhere secure
Step 6 — Test the connection
- Connect each device to the new WiFi network
- Open a browser and load a page to confirm internet access
- Run a speed test at
fast.comorspeedtest.net:- Results should be close to your ISP plan speed (within 10–20% variance is normal on WiFi)
- If speeds are significantly lower, see the FAQ below
Frequently asked questions
WiFi signal is weak in certain rooms. The router’s placement is the most likely cause. Move it closer to the center of your home. If the building has concrete or brick walls, consider a WiFi range extender or mesh network system to fill dead zones.
Speed is much slower than my ISP plan. Over WiFi, speeds are lower than Ethernet by design — interference, signal strength, and protocol overhead all reduce throughput. Connect a laptop via Ethernet cable directly to the router and run a speed test — if that speed matches your plan, the router hardware is fine and the issue is WiFi signal quality, not the router or ISP connection.
Multiple devices connecting causes speed drops. This is normal for lower-end routers and the 2.4 GHz band. Distribute devices between the 2.4 GHz and 5 GHz bands. Connect high-bandwidth devices (streaming boxes, game consoles) via Ethernet. If the router is more than 4–5 years old, an upgrade to a WiFi 6 router significantly improves multi-device performance.