Search 'Create a restore point' in the Start menu, open System Properties, click Create at the bottom, type a description, and click Create — Windows saves the restore point in under two minutes and you can roll back to it any time from the System Restore wizard.
Creating a restore point before making system changes takes less than two minutes and gives you an instant rollback option if something breaks. It is the equivalent of a save point in a video game — make a change, and if it goes wrong, restore to exactly the state you saved.
Windows creates restore points automatically before major changes like Windows Updates and driver installs. Manual restore points are for everything else: third-party software, downloaded drivers, registry edits, or any change where you want a guaranteed fallback.
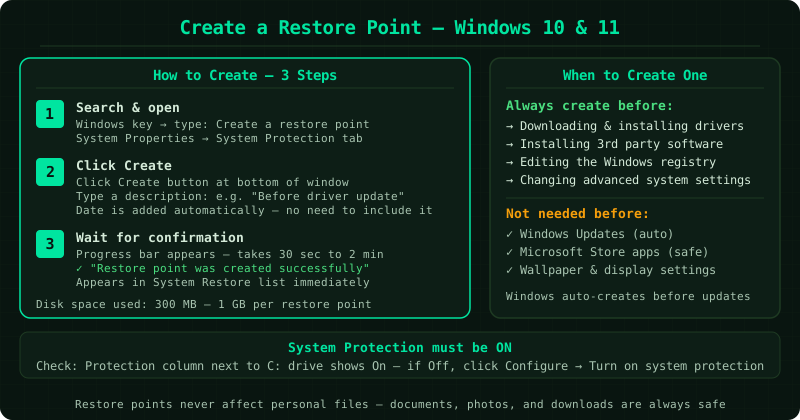
When to create a restore point
Always create one before: Installing software from outside the Microsoft Store, downloading and installing device drivers from manufacturer websites, editing the Windows registry, or changing advanced system settings.
Not necessary before: Windows Updates (automatically protected), Microsoft Store app updates, or changes to personal file settings like wallpaper or display brightness.
How to verify the fix
After creating a restore point, open System Restore (search “Create a restore point” → click System Restore → Next) and confirm the new restore point appears at the top of the list with your description and the current date. Seeing it in the list confirms it is saved and ready to use. If you later need to undo changes, follow the Restore From a Restore Point guide to use it.
Frequently Asked Questions
How much disk space do restore points use?
Each restore point typically uses 300 MB to 1 GB, depending on how many system files and registry entries have changed since the previous restore point. Windows manages the total space used by restore points according to the Max Usage setting in System Protection — once the limit is reached, Windows deletes the oldest restore points to make room for new ones. A 10 GB allocation is sufficient to keep several weeks of restore points on most systems.
Can I create a restore point from Command Prompt?
Yes. Open Command Prompt as administrator and run: wmic.exe /Namespace:\\root\default Path SystemRestore Call CreateRestorePoint 'Description here', 100, 7 — replace 'Description here' with your restore point name. Press Enter and wait for the result. If it returns ReturnValue = 0, the restore point was created successfully. This method is useful for scripting automatic restore point creation before running batch changes.
Why does Windows say it cannot create a restore point?
The most common causes are that System Protection is turned off for the drive, the disk does not have enough free space (Windows needs at least 300 MB free on the system drive to create a restore point), or the System Protection service is not running. Check that System Protection shows On in the System Properties window, ensure the C: drive has sufficient free space, and try again. If the error persists, run sfc /scannow in an elevated Command Prompt to check for system file corruption.
How often should I create manual restore points?
Create a manual restore point before any of the following: installing software downloaded from outside the Microsoft Store, updating a device driver manually, editing the Windows registry, changing system settings you are unfamiliar with, or installing a program that modifies system files. For routine day-to-day use and official Windows Updates, automatic restore points are sufficient — Windows creates them before every significant update.
Does creating a restore point slow down my computer?
Creating a restore point briefly uses CPU and disk resources for 30 seconds to 2 minutes, during which you may notice slightly slower response. Once the restore point is saved, there is no ongoing performance impact. Keeping System Protection enabled does not consume resources between restore point creation events — Windows only reads and writes restore point data during creation and restoration.
