When a driver installation, Windows Update, or software change causes your PC to crash, slow down, or produce error messages, System Restore can roll the system back to a point where it was working correctly — without touching your documents, photos, or other personal files.
This guide walks through exactly how to use an existing restore point to undo system changes. To create a restore point before making changes, see Create a Restore Point on Windows.
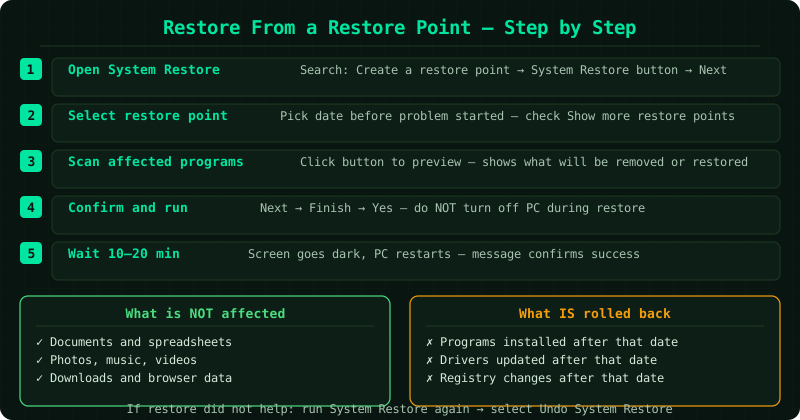
What gets restored and what stays the same
Restored to the earlier state: Windows system files, the registry, installed programs and drivers.
Not affected: Personal files — documents, spreadsheets, photos, music, videos, downloads, and browser bookmarks. These remain exactly as they are regardless of which restore point you select.
Removed: Any program or driver installed after the restore point date. Windows shows you this list before you confirm, so you know what will be affected.
How to verify the fix
After System Restore completes and Windows restarts, test the specific issue that caused the problem. Open the application that was crashing, reproduce the steps that triggered the error, or check the settings that had changed. If the problem is gone, the restore succeeded. If the problem remains, run System Restore again and select an older restore point — the issue may predate the restore point you chose.
If you need to undo the restore, open System Restore again immediately and select the Undo option before running any new restore operations.
Frequently Asked Questions
Can I undo a System Restore if it does not help?
Yes. Open System Restore again (search 'Create a restore point' → System Restore button), and the first option presented is Undo System Restore. Select it and click Next to reverse the restore operation. Windows returns to exactly the state it was in before the restore ran. This undo option is only available until the next System Restore operation overwrites it.
Why does System Restore say it cannot find any restore points?
Restore points only exist if System Protection was enabled before the problem occurred. System Protection is on by default for the C: drive on most Windows installations, but it can be disabled by system administrators, disk cleanup tools, or after a Windows reset. If no restore points are available, the alternative options are Windows Reset (Settings → System → Recovery → Reset this PC) or restoring from a full system image backup.
System Restore failed — what do I do?
If System Restore fails with an error, the most common causes are a corrupted restore point, antivirus software blocking the operation, or a hardware problem. Try running System Restore in Safe Mode: restart your PC, hold Shift while clicking Restart, go to Troubleshoot → Advanced options → System Restore. Safe Mode prevents third-party software from interfering. If it still fails, run sfc /scannow in an elevated Command Prompt to repair corrupted system files before retrying.
Will System Restore remove installed programs?
Yes. Any program installed after the selected restore point was created will be removed as part of the restore. Windows shows a list of affected programs before you confirm the operation — click 'Scan for affected programs' in the restore point selection step to preview exactly what will be removed and what will be restored. Programs that existed before the restore point are reinstated to their previous state.
How long does System Restore take?
System Restore typically takes 10 to 20 minutes on most systems. The duration depends on the number of files affected by the restore, the speed of the drive, and how many changes occurred between the restore point date and the current state. SSDs complete the restore faster than traditional hard drives. The PC restarts once or twice during the process.
