Press Windows + S, search 'Create a restore point', open System Properties, click System Restore, select a restore point from before the problem started, and confirm — Windows 10 rolls back system files and drivers in 10–20 minutes without affecting personal files.
System Restore on Windows 10 is a built-in rollback tool that undoes software changes — driver installs, Windows Updates, program installations — that caused problems, without affecting your documents or personal files. It works by restoring Windows system files, the registry, and installed programs to a saved restore point from before the issue began.
This guide covers enabling System Restore on Windows 10, selecting the right restore point, running the restore from both the normal desktop and Safe Mode, and accessing it when Windows 10 will not start.
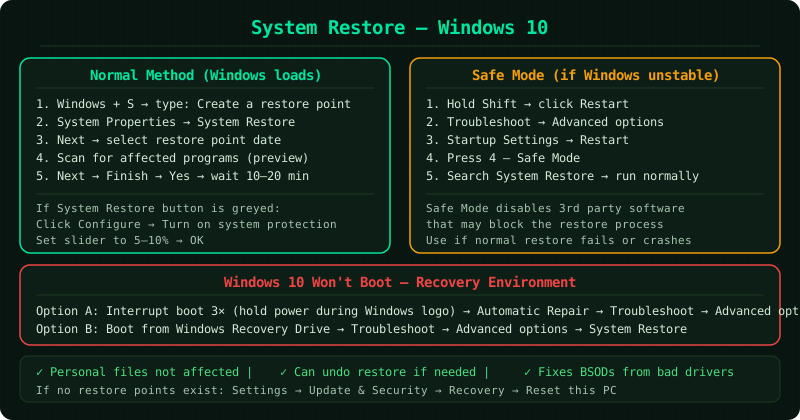
Before you start
Confirm System Protection is enabled on Windows 10 (Step 1 below). If it was disabled, no restore points exist and System Restore cannot reach any previous state. In that case, the alternatives are a Windows Reset (Settings → Update & Security → Recovery → Reset this PC) or restoring from a full system image backup if one was created.
How to verify the fix
After System Restore completes on Windows 10, test the exact issue that prompted the restore — open the application that was crashing, run the task that triggered the error, or confirm the BSOD no longer appears after a restart. If the problem is gone, the restore succeeded. If it persists, select an older restore point. If System Restore cannot resolve the issue, see Windows Recovery Drive for booting into the full Windows Recovery Environment.
Frequently Asked Questions
Why is System Restore not fixing the problem on Windows 10?
The most common reason is that the selected restore point was created after the problem began — choose an older restore point and try again. If the problem began gradually over time rather than suddenly, it may predate all available restore points. Other causes: System Restore completed successfully but a different issue is causing the symptom, the problem is hardware-related (System Restore does not fix hardware failures), or a virus modified system files that System Restore cannot fully repair.
How do I enable System Restore on Windows 10 if it was disabled?
Search 'Create a restore point', open System Properties, select the C: drive in the Protection Settings list, click Configure, and choose Turn on system protection. Set the Max Usage to at least 5% and click OK. System Restore is now enabled. Windows will create restore points automatically before future Windows Updates and driver installs. To create an immediate restore point, click the Create button in the System Properties window.
Windows 10 System Restore says there are no restore points — why?
Restore points are absent when System Protection was disabled at the time the restore points would have been created. Disk cleanup tools, storage optimization software, and some system optimisers delete restore points or disable System Protection. If you have never checked System Protection and no restore points exist, the protection was likely off. Enable it now for future protection — it cannot recover past events retroactively.
Does System Restore fix Windows 10 crashes caused by Windows Updates?
Yes, in most cases. Windows 10 automatically creates a restore point before applying Windows Updates. If an update causes crashes or errors, run System Restore and select the restore point created just before the update. This uninstalls the update and returns Windows to its pre-update state. The update may attempt to reinstall automatically — pause Windows Update from Settings → Update & Security → Windows Update → Advanced options → Pause updates to prevent this while you troubleshoot.
Can System Restore fix a Windows 10 blue screen (BSOD)?
Yes, if the blue screen is caused by a bad driver or corrupted system file that was introduced after a restore point was created. System Restore is one of the first tools to try for BSODs that started after a specific change. Note the stop code displayed on the blue screen — codes like DRIVER_IRQL_NOT_LESS_OR_EQUAL or BAD_POOL_CALLER often indicate driver problems that a restore point can reverse. Codes indicating hardware failure (MEMORY_MANAGEMENT, HARDWARE_MALFUNCTION) are not fixed by System Restore.
