Connect a USB drive with at least 16 GB of free space, search 'Create a recovery drive' in the Start menu, check 'Back up system files to the recovery drive', click Next, select your USB drive, and click Create — the drive takes 15–30 minutes to prepare and can boot your PC for repairs when Windows won't start.
A Windows recovery drive is a bootable USB stick that can start your PC and run repair tools when Windows itself will not load. If your PC displays a black screen on startup, loops through error messages, or is stuck in an automatic repair cycle, the recovery drive gives you access to System Restore, Startup Repair, and reinstallation options that are otherwise inaccessible.
Creating the recovery drive takes 15 to 30 minutes and should be done while Windows is working — not after the problem occurs. Store it somewhere accessible so it is ready when needed.
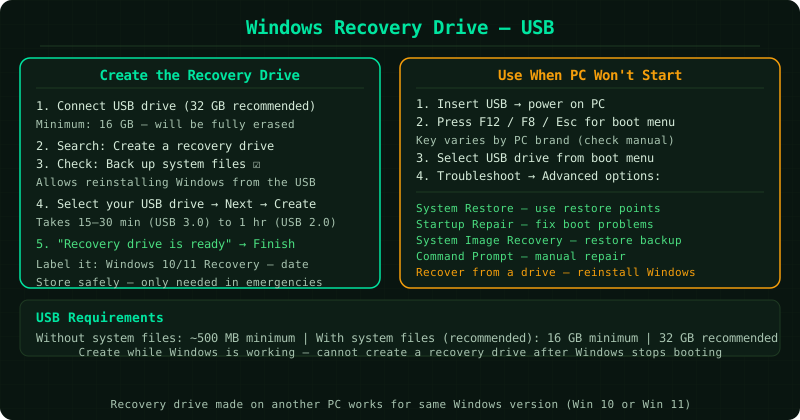
What the recovery drive can do
Startup Repair: Automatically diagnoses and fixes boot problems such as corrupted boot records and missing system files.
System Restore: Rolls back to a restore point saved on the system drive — even when Windows itself will not start.
System Image Recovery: Restores from a full Windows system image backup you previously saved to an external drive.
Command Prompt: Manual repair commands including sfc /scannow, chkdsk, and bootrec /fixmbr.
Recover from a drive: Full Windows reinstall from the files on the recovery USB — last resort when all other repairs fail.
How to verify the fix
After booting from the recovery drive and running the appropriate repair tool, restart the PC without the USB drive inserted. If Windows loads normally and the original problem is gone, the repair succeeded. If the PC still will not start, return to the recovery drive and try a different repair option — Startup Repair, a different System Restore point, or as a last resort, Recover from a drive to reinstall Windows.
Frequently Asked Questions
Can I use a recovery drive from a different PC?
A recovery drive made on one Windows PC can boot other PCs with the same Windows version (10 or 11). However, the 'Recover from a drive' reinstall option may not work correctly across different PC hardware configurations. The repair tools (Startup Repair, System Restore, Command Prompt) work regardless of which specific PC made the drive. For the most reliable results, create the recovery drive on the PC you intend to repair.
How is a recovery drive different from a Windows installation USB?
A recovery drive is created using Windows' built-in tool and is specific to the Windows installation on your PC. It includes system files and recovery tools but cannot be used to activate Windows on a new device. A Windows installation USB is downloaded from Microsoft's website and can install Windows on any compatible PC. Both can boot a PC and access repair tools — the recovery drive is easier to create but less universal.
What is the minimum USB size for a Windows recovery drive?
Without system files (the 'Back up system files' checkbox unchecked), the recovery drive requires approximately 500 MB. With system files checked, it requires 16 GB. A 32 GB USB drive is the recommended size — it provides sufficient space for the system files option and leaves room in case requirements change with Windows updates.
Does creating a recovery drive protect my personal files?
The recovery drive itself does not back up your personal files — it only contains Windows system and recovery tools. To back up personal files, use File History (Settings → System → Storage → Backup options) or copy files manually to an external drive. For a complete backup including personal files and the Windows installation, use the system image feature in Control Panel → Backup and Restore (Windows 7). See the [Windows Backup and Restore guide](/computers/windows-backup-and-restore/) for details.
My PC won't start — can I still create a recovery drive on another computer?
Yes. Create the recovery drive on any other Windows 10 or Windows 11 PC — the recovery tools on the drive are not tied to the specific PC it was made on. The tools it contains (Startup Repair, System Restore, Command Prompt) work on any Windows 10 or 11 PC. The 'Recover from a drive' reinstall option will reinstall the Windows version of the PC the drive was created on, which should be compatible if both PCs run the same Windows version.
