
Windows 11 installation fails when the upgrade or cumulative update begins — the download completes, but the installation stops partway through and Windows rolls back to the previous state. According to Microsoft’s official documentation, the most common causes are a corrupted Windows component store, driver conflicts that interrupt the installation process, and missing hardware requirements like TPM 2.0 or Secure Boot.
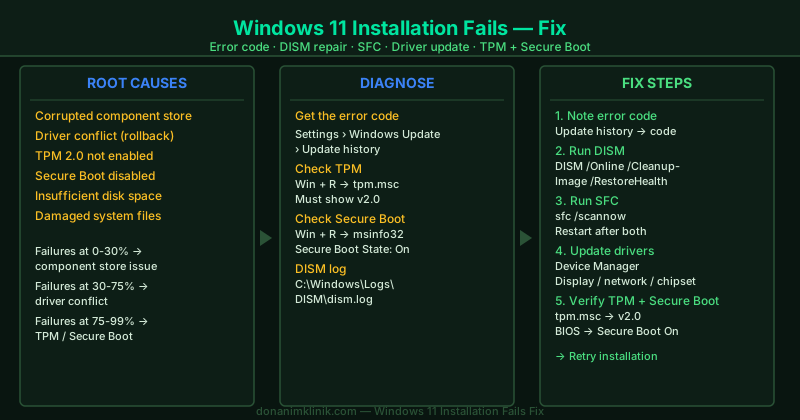
What causes Windows 11 installation to fail
Windows 11 installation modifies the Windows Component Store (C:\Windows\WinSxS) — the repository of all Windows files. If this store has corrupted entries, the installation cannot complete. Other causes:
- Corrupted Windows component store — the primary cause of mid-installation failures with no obvious error
- Driver conflicts — a hardware driver (display, network, chipset) cannot initialize in the new Windows environment
- TPM 2.0 not enabled or not detected — Windows 11 enforces TPM 2.0 during installation, not just at the start
- Secure Boot disabled or in Legacy mode — the installation requires UEFI firmware with Secure Boot enabled
- Insufficient disk space — installation needs at least 10 GB free for cumulative updates, 20+ GB for version upgrades
- Corrupted individual system files — files that the installation needs to replace are already damaged
How to fix Windows 11 installation fails
Step 1 — Note the error code from Update history
Before applying any fix, record the exact error code — it determines the correct solution and saves time.
- Go to Settings → Windows Update → Update history
- Find the failed installation entry and click to expand it
- Note the error code (for example, 0x800f0922, 0xc1900101, 0x8007001f)
If no code appears in Update history:
- Press Win + S, search for Event Viewer, and open it
- Expand Windows Logs → System
- Click Filter Current Log → set Source to WindowsUpdateClient
- Find entries near the time of the failure — the error code appears in the Event description
With the error code recorded, the steps below give you the most targeted fix.
Step 2 — Run DISM to repair the Windows component store
DISM is the correct tool for installation failures because it repairs the component store — the exact resource that installation modifies.
Open Command Prompt as administrator and run:
DISM /Online /Cleanup-Image /RestoreHealthDISM contacts Windows Update servers to download replacement files. This takes 15–30 minutes. The progress counter may pause at 20%, 65%, or other points — this is normal behavior. Do not close the window or shut down the PC.
When complete, DISM reports: “The restore operation completed successfully.”
If DISM cannot connect to Windows Update, add /Source to specify a local source, or check your internet connection and run the Windows Update Troubleshooter first.
Step 3 — Run SFC after DISM completes
After DISM repairs the component store, SFC repairs individual system files using that now-repaired store as its source. Running SFC before DISM may produce incorrect results if the store itself is corrupted.
In the same administrator Command Prompt, run:
sfc /scannowSFC scans all protected Windows system files. When complete, it reports one of:
- “Windows Resource Protection did not find any integrity violations” — no additional repair needed
- “Windows Resource Protection found corrupt files and repaired them” — files were repaired
After SFC completes, restart your PC, then go to Settings → Windows Update → Check for updates and retry the installation.
Step 4 — Update or roll back drivers in Device Manager
Driver conflicts cause installation rollback — the installation applies successfully until a driver component fails, triggering an automatic rollback.
- Right-click Start → Device Manager
- Look for devices with a yellow warning triangle (!)
- Right-click each flagged device → Update driver → Search automatically for drivers
- For display adapters, network adapters, and chipset drivers — visit the manufacturer’s website for the latest version even if Device Manager shows no warning:
- NVIDIA/AMD/Intel graphics: nvidia.com, amd.com, intel.com
- Network adapters: motherboard or laptop manufacturer’s support page
- If any driver was recently updated before installation failures began: right-click the device → Properties → Driver tab → Roll Back Driver
After driver changes, restart your PC, then retry the installation.
Step 5 — Verify TPM 2.0 and Secure Boot are enabled
Windows 11 enforces TPM 2.0 and Secure Boot during installation. If either is disabled, the installation will fail — sometimes partway through rather than at the start.
Check TPM status:
- Press Win + R, type
tpm.msc, press Enter - Confirm Status: The TPM is ready for use and Specification Version: 2.0
- If TPM shows version 1.2 or “Not Found”: restart and enter BIOS/UEFI (typically Del, F2, or F10 — shown briefly during startup)
- Find the Security or Trusted Computing section and enable:
- Intel systems: PTT (Platform Trust Technology)
- AMD systems: fTPM (Firmware TPM)
Check Secure Boot:
- In BIOS/UEFI, navigate to the Boot section
- Confirm Secure Boot: Enabled
- Confirm the firmware mode is UEFI (not Legacy or CSM)
Save all changes and exit BIOS/UEFI. After restarting, retry the Windows 11 installation.
How to verify the fix
- Go to Settings → Windows Update → Update history
- Confirm the previously failing entry now shows Successfully installed
- Check Settings → System → About — the Windows 11 version number confirms the upgrade completed
If installation still fails after completing all five steps, consult the Windows 11 Upgrade Errors hub for error-code-specific guides, or contact Microsoft Support at support.microsoft.com with the exact error code from Update history.