
Windows 11 update failed means a cumulative update, security patch, or driver update downloaded successfully but could not complete installation — Windows Update shows a “Failed” status in Update history. According to Microsoft’s official troubleshooting documentation, the most common causes are a corrupted Windows component store, driver conflicts that interrupt installation, and a corrupted SoftwareDistribution download cache.
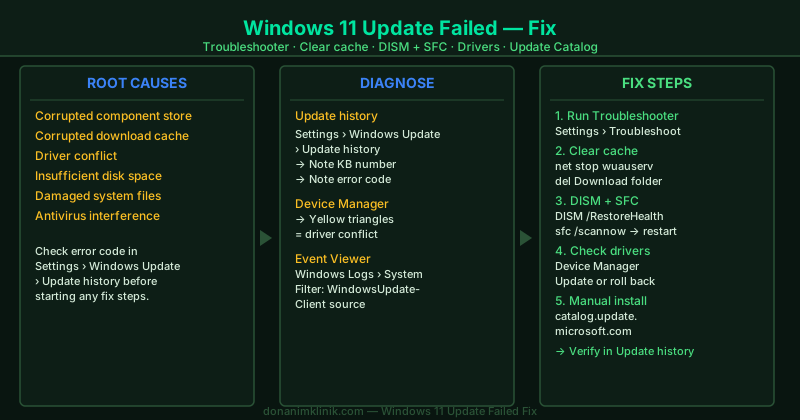
What causes Windows 11 updates to fail
Windows 11 update failures at the installation stage — as opposed to the download stage — typically come from one of these sources:
- Corrupted Windows component store — the WinSxS directory that updates modify has damaged entries, preventing the new files from being applied correctly
- Driver conflict — a hardware driver cannot initialize in the updated Windows environment, triggering an automatic rollback
- Corrupted SoftwareDistribution cache — partially downloaded or corrupted package files that Windows attempts to install from
- Insufficient disk space — cumulative updates require 3–5 GB free; the installation fails silently if space runs out mid-install
- Corrupted system files — individual system files that the update needs to replace are locked or already damaged
How to fix Windows 11 update failed
Step 1 — Run the Windows Update Troubleshooter
The Windows Update Troubleshooter is Microsoft’s first-line diagnostic tool. It checks the Windows Update service (wuauserv), Background Intelligent Transfer Service (BITS), and update metadata integrity, and applies automatic repairs.
- Go to Settings → System → Troubleshoot → Other troubleshooters
- Click Run next to Windows Update
- Follow any prompts and apply suggested fixes
- Restart your PC when the troubleshooter completes
- Go to Settings → Windows Update → Check for updates and retry
This step alone resolves failures caused by stopped services or misconfigured service settings.
Step 2 — Clear the SoftwareDistribution folder
Windows Update downloads update packages to C:\Windows\SoftwareDistribution\Download. If any package file is corrupted — from a previous failed download or a power interruption — Windows retries from the corrupted file and fails again. Deleting the contents forces a clean re-download.
- Right-click Start → Terminal (Admin) or Command Prompt (Admin)
- Stop the update services:
net stop wuauserv
net stop bits- Open File Explorer and navigate to
C:\Windows\SoftwareDistribution\Download - Select all contents (Ctrl+A) and delete — leave the Download folder itself in place
- Return to Command Prompt and restart the services:
net start wuauserv
net start bits- Go to Settings → Windows Update → Check for updates
Windows re-downloads the failed update package from scratch. The first check may take a few minutes longer than usual.
Step 3 — Run DISM then SFC to repair system files
If clearing the cache did not resolve the failure, the Windows component store — the repository that updates modify — may be corrupted. DISM repairs it by downloading replacement components directly from Windows Update.
Open Command Prompt as administrator and run:
DISM /Online /Cleanup-Image /RestoreHealthThis contacts Windows Update servers to download and replace damaged component store files. It takes 10–30 minutes. Do not close the window.
After DISM completes, run SFC to repair individual system files:
sfc /scannowSFC uses the repaired component store as its source. When it finishes, restart your PC, then go to Settings → Windows Update → Check for updates and retry the failed update.
Step 4 — Check driver compatibility in Device Manager
Driver conflicts are a leading cause of update installation rollback — the update begins applying, a driver fails to initialize in the new environment, and Windows rolls back automatically.
- Right-click Start → Device Manager
- Look for any device with a yellow warning triangle — this indicates a problem
- Right-click the flagged device → Update driver → Search automatically for drivers
- If no automatic update is found, visit the manufacturer’s website and download the latest driver manually
- Also check for recently updated drivers: right-click a device → Properties → Driver tab → use Roll Back Driver if a recent update is listed
After updating or rolling back drivers, restart your PC and retry the Windows update.
Step 5 — Install the update manually from Microsoft Update Catalog
If Windows Update continues failing for a specific update, download and install it directly from Microsoft’s Update Catalog — this bypasses the Windows Update delivery mechanism entirely.
- Go to Settings → Windows Update → Update history
- Note the KB number of the failed update (for example, KB5034123)
- Open a browser and go to catalog.update.microsoft.com
- Search for the KB number and download the version matching your Windows edition and processor (x64 for most PCs)
- Run the downloaded
.msufile as administrator - Follow the installation prompts and restart when prompted
- Go to Settings → Windows Update → Update history and confirm the status shows Successfully installed
How to verify the fix
Go to Settings → Windows Update → Update history after the update installs. The entry for the previously failed update should show Successfully installed with today’s date. If Windows Update now shows “You’re up to date,” the issue is resolved.
If updates continue failing with the same error code, check the specific guide for that code: error 0xc1900101 (driver rollback) or the Windows 11 Upgrade Errors hub for additional guides.