When a Windows 11 update, driver installation, or software change causes your PC to crash, slow down, or display errors, System Restore rolls the system back to a previous working state in about 15 minutes. Your personal files — documents, photos, and downloads — are not affected by the restore.
System Restore on Windows 11 works the same way it did in Windows 10, but the path to find it changed: it is no longer in the Settings app and is instead accessed by searching for “Create a restore point” in the Start menu.
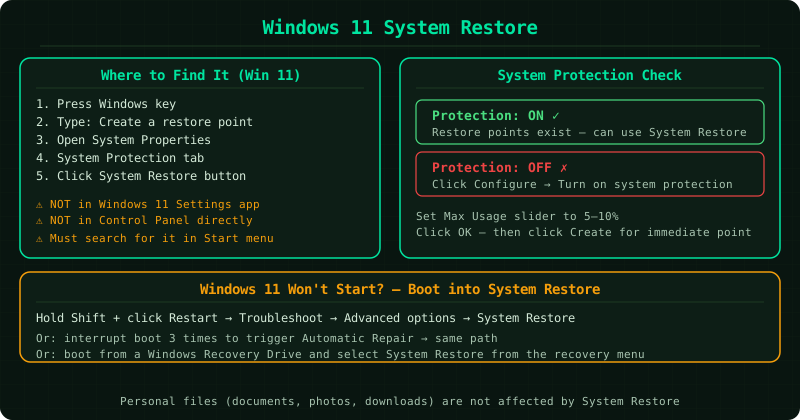
Before you start — confirm System Protection is on
System Restore requires System Protection to be enabled. On many Windows 11 installations, it is on by default. To verify: search “Create a restore point” → check the Protection column next to the C: drive. If it shows Off, enable it before looking for restore points — though this will not create retroactive points for events that already happened.
If your Windows 11 PC will not start and you cannot reach the desktop, skip directly to Step 6: running System Restore from the Windows 11 boot options.
How to verify the fix
After the restore completes and Windows 11 restarts, open the notification that confirms the restore outcome. Test the specific problem that triggered the restore — run the application that was crashing, reproduce the steps that caused the error, or check the settings that had changed. A successful restore resolves problems caused by system changes made after the restore point date. If the issue predates the restore point you chose, run System Restore again and select an older point.
If the restore did not improve the situation, use the Undo System Restore option in the same wizard before attempting any other changes.
Frequently Asked Questions
Where is System Restore on Windows 11?
System Restore is not in the Windows 11 Settings app. Access it by searching 'Create a restore point' in the Start menu search bar and clicking the matching result. This opens the System Properties window where the System Restore button appears under the System Protection tab. Alternatively, open the Control Panel, go to System, and click System Protection in the left panel.
Why is the System Restore button greyed out in Windows 11?
The System Restore button is greyed out when System Protection is disabled for the selected drive. Click Configure next to the C: drive in the System Properties window, select Turn on system protection, and click OK. The button becomes active immediately. Note that enabling System Protection now does not create retroactive restore points — it only enables the creation of new ones going forward.
Does System Restore affect Windows 11 personal files?
No. System Restore on Windows 11 does not delete, modify, or move personal files including documents, photos, videos, music, or downloads. It only changes system files, the registry, and installed programs. Before confirming any restore, click 'Scan for affected programs' to see exactly which programs and drivers will be changed — personal files never appear in this list.
Windows 11 System Restore failed — how do I fix it?
If System Restore fails on Windows 11, try running it from Safe Mode: restart your PC and hold Shift while clicking Restart, then go to Troubleshoot → Advanced options → Startup Settings → Restart → press 4 for Safe Mode. Once in Safe Mode, search for and run System Restore normally. Safe Mode prevents third-party programs and security software from blocking the restore. If it still fails, run sfc /scannow in an elevated Command Prompt to repair system file corruption before retrying.
How do I create a restore point manually in Windows 11?
Search 'Create a restore point' in the Start menu, open the System Properties window, and click Create at the bottom. Type a description (such as 'Before driver update'), click Create, and Windows saves the restore point immediately. The process takes 30 seconds to 2 minutes. Create a restore point before installing major software, updating drivers, or editing the registry — it gives you a one-click rollback option if something breaks.
