
Windows 11 upgrade fails refers to version upgrades — moving from Windows 11 22H2 to 23H2, or 23H2 to 24H2 — that fail to complete, either during download, during installation, or after the post-restart configuration phase. According to Microsoft’s official documentation, version upgrades have stricter requirements than monthly cumulative updates: they modify more Windows components, require 20+ GB of free disk space, and are more sensitive to corrupted component store entries.
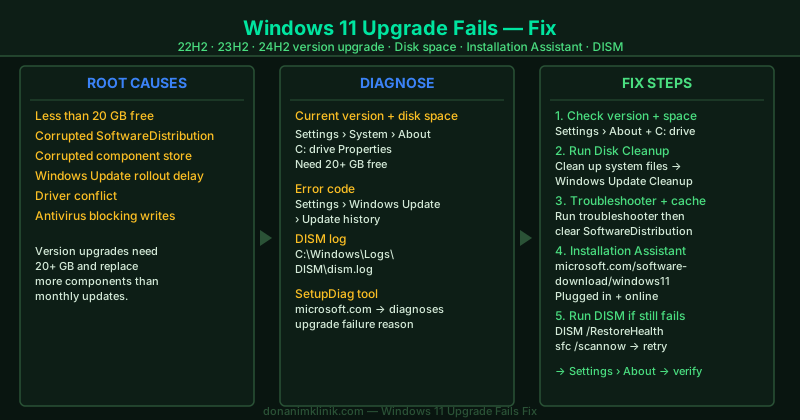
What causes Windows 11 version upgrades to fail
Version upgrades are more complex than monthly updates — they replace core Windows components rather than patching them. Common failure points:
- Insufficient disk space — version upgrades require 20+ GB free; running out mid-installation causes a rollback
- Corrupted SoftwareDistribution cache from a previous failed attempt — re-attempting the upgrade from corrupted cached data repeats the failure
- Corrupted Windows component store — the upgrade cannot apply new components to a damaged WinSxS directory
- Windows Update delivery delay — staged rollout may not have reached your PC yet; the Installation Assistant bypasses this
- Driver conflict during the upgrade — a driver incompatible with the new version causes a rollback
- Antivirus interference — security software blocking file writes during the extensive component replacement
How to fix Windows 11 upgrade fails
Step 1 — Check current version and free disk space
Before attempting any fix, confirm your current Windows 11 version and the available disk space.
Check current version:
- Go to Settings → System → About
- Under Windows specifications, note the Version field (for example, 23H2)
Check disk space:
- Open File Explorer
- Right-click drive C: → Properties
- Note the Free space value — version upgrades require at least 20 GB free
If free space is below 20 GB, complete Step 2 before attempting the upgrade. Attempting a version upgrade without sufficient space guarantees a rollback.
Step 2 — Run Disk Cleanup to free disk space
Disk Cleanup’s “Clean up system files” option can recover significant space — often 5–15 GB — by removing old Windows Update packages and delivery optimization files.
- Search Disk Cleanup in Start and open it
- Select drive C: → click OK
- Click Clean up system files (requires administrator)
- In the expanded list, check:
- Windows Update Cleanup — removes superseded update packages
- Delivery Optimization Files — removes update package copies used for peer delivery
- Temporary files
- Recycle Bin
- Click OK → Delete Files to confirm
- After Disk Cleanup completes, verify drive C: now has at least 20 GB free
If Disk Cleanup is not enough, uninstall unused applications at Settings → Apps → Installed apps.
Step 3 — Run Windows Update Troubleshooter then clear SoftwareDistribution cache
A previous failed upgrade attempt may have left corrupted package data in the SoftwareDistribution folder. The retry will attempt to use this corrupted data and fail again.
Run the troubleshooter:
- Go to Settings → System → Troubleshoot → Other troubleshooters
- Click Run next to Windows Update
- Apply any suggested fixes and restart your PC
Clear the SoftwareDistribution cache:
- Open Command Prompt as administrator
- Stop update services:
net stop wuauserv
net stop bits- Open File Explorer → navigate to
C:\Windows\SoftwareDistribution\Download - Select all contents (Ctrl+A) → delete — leave the Download folder in place
- Restart services:
net start wuauserv
net start bits
Step 4 — Use the Windows 11 Installation Assistant
The Installation Assistant is the recommended upgrade path when Windows Update fails to deliver or install a version upgrade. It operates independently of the Windows Update service configuration.
- Open a browser and go to microsoft.com/software-download/windows11
- Under Windows 11 Installation Assistant, click Download Now
- Run the downloaded file as administrator
- Accept the license terms → click Accept and install
- Keep your PC:
- Plugged into power throughout
- Connected to the internet (downloads ~4–5 GB)
- Allow the process to complete through all restarts — do not shut down the PC manually
- After the final restart, confirm at Settings → System → About that the version number has updated
The entire process takes 30–90 minutes depending on your hardware and internet speed.
Step 5 — Run DISM if upgrade still fails after Installation Assistant
If the Installation Assistant also fails, the Windows component store has corrupted entries that prevent the upgrade from applying new components.
Open Command Prompt as administrator:
DISM /Online /Cleanup-Image /RestoreHealthThis downloads and replaces damaged files in the component store from Windows Update. It takes 15–30 minutes. When complete, run:
sfc /scannowAfter both complete, restart your PC, then run the Installation Assistant again from microsoft.com/software-download/windows11. The repaired component store allows the upgrade to complete.
How to verify the fix
- Go to Settings → System → About
- Under Windows specifications, confirm Version shows the current release (24H2 as of 2026)
- Go to Settings → Windows Update → Update history — the version upgrade entry should show Successfully installed
If the version upgrade still fails after completing all five steps, consult the Windows 11 Upgrade Errors hub or contact Microsoft Support at support.microsoft.com with the error code from Update history.