
Windows 11 won’t install when the PC either fails hardware requirements and the upgrade is never offered, or when the Installation Assistant reports a compatibility block before beginning. According to Microsoft’s official documentation, the most common reasons are TPM 2.0 disabled in BIOS, Secure Boot turned off or in Legacy mode, and CPU incompatibility — all of which PC Health Check identifies specifically.
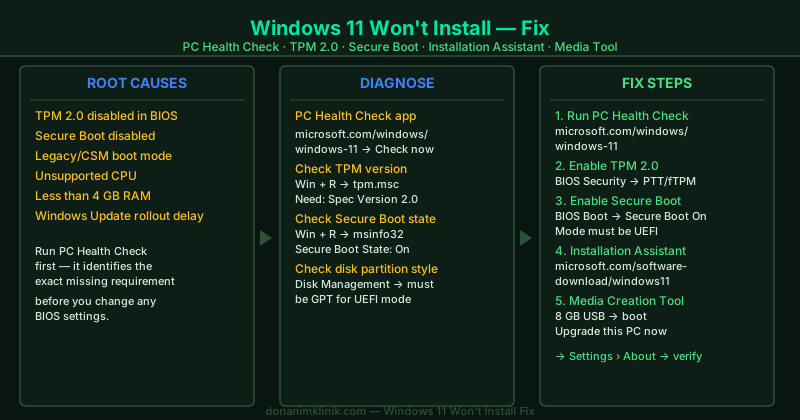
Why Windows 11 won’t install on your PC
Windows 11 enforces hardware requirements that Windows 10 did not. These requirements are checked before the installation begins:
- TPM 2.0 not enabled — present in most post-2016 hardware but often disabled by default in BIOS
- Secure Boot disabled — frequently disabled on dual-boot systems or older BIOS configurations
- Legacy/CSM boot mode — Secure Boot requires UEFI mode; Legacy mode blocks Windows 11 installation
- CPU not on the supported list — Intel 7th generation and older, AMD Ryzen 1000 and older are not supported
- Insufficient RAM or storage — 4 GB RAM and 64 GB storage are minimum requirements
- Windows Update delivery delay — eligible PCs may not yet be offered Windows 11 through Windows Update due to staged rollout
How to fix Windows 11 won’t install
Step 1 — Run PC Health Check to identify the missing requirement
Guessing which requirement is missing leads to unnecessary BIOS changes. PC Health Check gives you the exact answer in one step.
- Go to microsoft.com/windows/windows-11 and scroll to the Check compatibility section
- Download and run PC Health Check
- Click Check now
- Review the results — the app lists every requirement and marks failures with a clear description:
- “The PC must support Secure Boot” → Secure Boot is disabled (Step 3)
- “The PC must support TPM 2.0” → TPM needs to be enabled in BIOS (Step 2)
- “The processor isn’t supported” → CPU incompatibility, hardware replacement required
- “This PC doesn’t have enough RAM” → below 4 GB
- “Storage must be 64 GB or greater” → add storage or free space
Screenshot the results before making any changes.
Step 2 — Enable TPM 2.0 in BIOS/UEFI
Most PCs manufactured after 2016 include TPM 2.0 hardware — but it is disabled in BIOS by default.
- Restart your PC and press the BIOS entry key during startup:
- Dell: F2 or Del
- HP: F10 or Esc
- ASUS: Del or F2
- Lenovo: F1 or F2 (or Enter then F1 on some models)
- MSI: Del
- Navigate to the Security section (may also appear under Advanced or Trusted Computing)
- Enable the TPM option:
- Intel: Enable PTT (Platform Trust Technology)
- AMD: Enable fTPM (Firmware TPM)
- Save and exit (typically F10)
- After Windows boots, verify: press Win + R → type
tpm.msc→ confirm Specification Version: 2.0
Step 3 — Enable Secure Boot in BIOS/UEFI
Secure Boot must be enabled and the firmware must be in UEFI mode (not Legacy or CSM).
- Restart and re-enter BIOS/UEFI
- Navigate to the Boot section
- Set Secure Boot to Enabled
- Confirm Boot Mode is set to UEFI (not Legacy, CSM, or Compatibility Mode)
Before switching from Legacy to UEFI mode, check your disk partition style:
- Right-click Start → Disk Management
- Right-click your primary disk → Properties → Volumes tab
- Check Partition style — if it shows MBR, you need to convert to GPT before enabling UEFI mode (use the MBR2GPT tool documented at docs.microsoft.com)
After enabling Secure Boot, verify in Windows: press Win + R → type msinfo32 → find Secure Boot State: On.
Step 4 — Use the Windows 11 Installation Assistant
If your PC passes health check but Windows Update has not offered Windows 11 yet, the Installation Assistant installs it directly without waiting for the staged rollout.
- Go to microsoft.com/software-download/windows11
- Download the Windows 11 Installation Assistant
- Run it as administrator
- Accept the license terms and click Accept and install
- Keep the PC plugged in and connected to the internet throughout
- The process downloads ~4–5 GB and requires two or three restarts
- After the final restart, Windows 11 is installed — your files and applications are preserved
Step 5 — Create installation media with Media Creation Tool
If the Installation Assistant reports an error or fails to complete, the Media Creation Tool creates a bootable USB that performs the upgrade directly.
- Go to microsoft.com/software-download/windows11
- Download the Windows 11 Media Creation Tool
- Insert a USB drive with at least 8 GB capacity (all existing contents will be erased)
- Run the tool → select Create installation media → choose language and edition
- Select USB flash drive and wait for the tool to download and write Windows 11 (~5–6 GB)
- Restart your PC and boot from the USB:
- Press F12 (most PCs), F8 (some ASUS/Gigabyte), or Esc (HP) during startup to open the boot menu
- Select the USB drive
- At the Windows 11 setup screen, select Upgrade this PC now to preserve files and apps
How to verify the fix
After installation completes, go to Settings → System → About and confirm:
- Edition: Windows 11 Home or Pro
- Version: 23H2 or 24H2 (current versions as of 2026)
If Windows 11 still will not install after completing these steps, consult the Windows 11 Upgrade Errors hub or contact Microsoft Support at support.microsoft.com with the specific error code or PC Health Check result.