
The Windows Update Troubleshooter is a built-in Microsoft diagnostic tool that automatically detects and repairs the most common causes of Windows Update failures. According to Microsoft’s official documentation, it checks service states, network connectivity to update servers, update database integrity, and Windows Firewall configuration — and applies fixes without requiring manual command-line steps.
Running the troubleshooter is the correct first step for any Windows Update problem before attempting manual fixes.
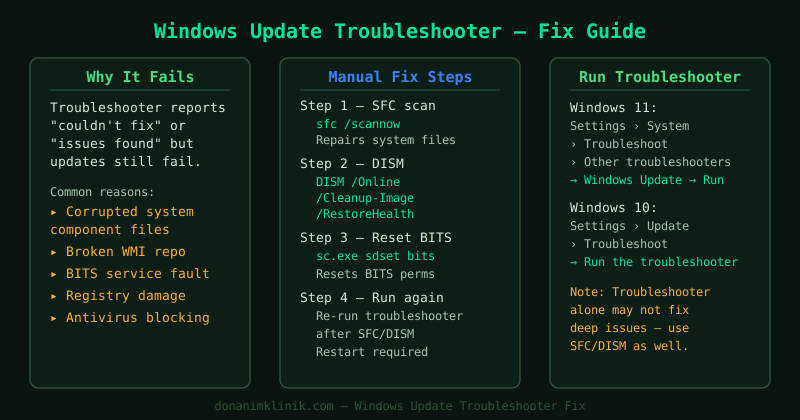
What the Windows Update Troubleshooter checks and fixes
According to Microsoft’s documentation, the troubleshooter performs the following checks automatically:
| Check | What it looks for | What it fixes |
|---|---|---|
| Windows Update service | Service stopped or in an error state | Restarts the service |
| BITS (Background Intelligent Transfer Service) | Service stopped | Restarts the service |
| Cryptographic Services | Service stopped | Restarts the service |
| Update database | Corrupted entries in the update registry | Clears and resets affected entries |
| Network connectivity | Cannot reach Microsoft update servers | Resets network components |
| Windows Firewall rules | Rules blocking update connections | Reports the conflict (cannot modify firewall rules automatically) |
| Pending reboot | Previous update is waiting for a restart | Alerts you to restart |
The troubleshooter cannot fix every update problem. It does not repair corrupted system files (that requires DISM and SFC), remove corrupted downloads from the SoftwareDistribution folder, or resolve errors caused by third-party antivirus or VPN software.
If the troubleshooter finds no problems but Windows Update still fails with a specific error code, use a targeted guide: error 0x80070005 (Access Denied) or error 0x800f0922 (System Reserved partition full).
How to run the Windows Update Troubleshooter
Step 1 — Open the troubleshooter on Windows 11
- Click Start and open Settings (the gear icon), or press Win + I
- Go to System → Troubleshoot → Other troubleshooters
- Scroll down to find Windows Update in the list
- Click Run
A diagnostic window opens immediately and begins scanning.
Step 2 — Open the troubleshooter on Windows 10
- Press Win + I to open Settings
- Go to Update & Security → Troubleshoot
- Click Additional troubleshooters (link at the top right of the page)
- Click Windows Update to expand the section
- Click Run the troubleshooter
Alternative method (both Windows 10 and 11):
Press Win + R, type msdt.exe /id WindowsUpdateDiagnostic, and press Enter. This opens the troubleshooter directly without navigating through Settings.
Step 3 — Let the scan complete and apply fixes
Once open, the troubleshooter runs automatically through several scan phases:
- Detecting problems — the tool checks all services and configurations
- Applying fixes — for each problem found, the tool attempts an automatic repair
- Verifying fixes — the tool confirms the repairs worked
If a fix requires your confirmation, a prompt appears with an Apply this fix button. Click it to proceed.
Some fixes display as Requires administrator access — if you are running the troubleshooter without administrator rights, close it and reopen it by right-clicking the Settings app and selecting Run as administrator, then navigate back to the troubleshooter.
Step 4 — Read the results report
When the scan finishes, the troubleshooter shows a results screen with one of three outcomes:
- “Fixed” — the problem was found and repaired automatically. Restart your PC and check for updates.
- “Detected” with instructions — a problem was found but requires a manual action. Follow the instructions shown.
- “No issues found” — the troubleshooter did not detect a problem. See Step 5.
Click View detailed information (available in some versions) to see a full log of every check performed and its result.
Step 5 — If the troubleshooter reports no issues but updates still fail
“No issues found” does not mean Windows Update is working correctly — it means the specific items the troubleshooter checks are all in order. The actual problem is likely in an area the tool does not cover.
In this case, proceed with manual fixes in this order:
1. Clear the SoftwareDistribution download cache: Open an administrator Command Prompt and run:
net stop wuauserv
net stop bits
Delete all files inside C:\Windows\SoftwareDistribution\Download, then run:
net start wuauserv
net start bits
2. Repair the Windows component store with DISM:
DISM /Online /Cleanup-Image /RestoreHealthThis repairs corrupted entries that prevent updates from installing, even when services appear to be running correctly.
3. Scan for corrupted system files:
sfc /scannowRun this after DISM completes. Restart after both commands finish.
See the Windows Update Not Working guide for the full manual fix sequence.
How to verify the troubleshooter worked
- After the troubleshooter completes and you restart, go to Settings → Windows Update
- Click Check for updates
- Updates should begin detecting and downloading without error
- Confirm in Settings → Windows Update → Update history that recent updates show Successfully installed
Frequently asked questions
The Windows Update Troubleshooter itself will not open.
If the troubleshooter window does not appear or closes immediately, try the direct command: press Win + R, type msdt.exe /id WindowsUpdateDiagnostic, and press Enter. If that also fails, the MSDT diagnostic service may be stopped — open services.msc, find Diagnostic Policy Service, and start it.
The troubleshooter says “Troubleshooting couldn’t identify the problem.” This is the same as “No issues found” — the tool checked everything it knows how to check and found nothing. Follow the manual fixes in Step 5. The most effective next step is running DISM to repair the Windows component store.
Do I need to download the Windows Update Troubleshooter? No. On Windows 10 and Windows 11, the troubleshooter is built into the operating system. Microsoft previously offered a standalone download for older Windows versions, but it is no longer necessary for current Windows releases. Use the Settings path described in Steps 1 and 2.