
A Brother printer that won’t connect to Wi-Fi displays a blinking WLAN light, shows “Connecting WLAN” on the control panel, or appears offline in Windows. This is one of the most reported Brother printer issues after a router change, firmware update, or network password update.
According to Brother’s official wireless troubleshooting documentation, the most common causes are outdated credentials stored on the printer, 5 GHz band incompatibility, and router security settings that block the printer’s wireless adapter.
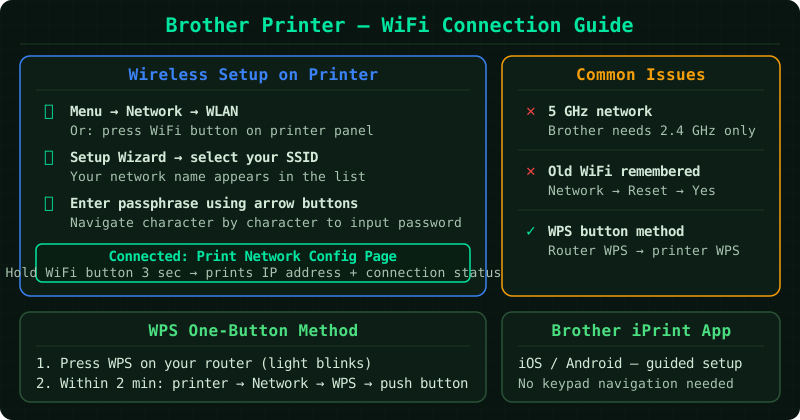
What causes Brother printer Wi-Fi connection failures
Brother printers store the Wi-Fi SSID and password internally. Connection failures occur when:
- Router or password changed — the printer still holds old credentials
- 5 GHz only network — Brother consumer models (DCP, MFC, HL series) support only 2.4 GHz
- WPA3 security — many Brother models cannot connect to WPA3-encrypted networks
- DHCP lease expired — the printer’s IP address reservation expired and the slot was taken
- Interference or signal weakness — the printer is too far from the router
How to fix Brother printer not connecting to Wi-Fi
Step 1 — Restart the printer, router, and computer
Brother’s support documentation requires a full three-device restart as the first troubleshooting step. Many connection failures are temporary and resolve with this alone.
- Press the Power button to turn off the Brother printer
- Unplug the router’s power cable from the wall
- Wait 60 seconds
- Plug the router back in — wait until all indicator lights are stable (30–60 seconds)
- Turn on the Brother printer and allow it to complete its startup sequence (up to 90 seconds)
- Restart the Windows computer as well
After all three devices have restarted, check the WLAN or Wi-Fi indicator on the printer. A solid light indicates a successful connection.
Step 2 — Run the Wireless Setup Wizard
If the printer did not automatically reconnect, use the built-in Setup Wizard to enter your network credentials manually.
On Brother models with a touchscreen (MFC-J series, DCP-J series):
- Tap Settings or the wrench icon
- Tap All Settings → Network → WLAN (or Wi-Fi)
- Tap Setup Wizard
- Select your Wi-Fi network from the list
- Enter the Wi-Fi password — it is case-sensitive
- Tap OK and wait for the Connected confirmation
On Brother models with a numeric keypad:
- Press Menu
- Use the arrow keys to navigate to Network and press OK
- Navigate to WLAN → Setup Wizard
- Select your network and enter the password
After the wizard confirms a connection, print a Network Configuration Report (Menu → Print Reports → Network Config) to verify the IP address and SSID.
Step 3 — Reset the network settings
If the Setup Wizard fails or the printer keeps disconnecting, a network reset clears all stored credentials and resolves conflicts from previous network configurations.
- Press Menu on the printer’s control panel
- Navigate to Network → Network Reset
- Press Yes to confirm
The printer’s wireless adapter resets — the WLAN light will blink as it restarts. After the reset, the printer has no stored network information. Run the Setup Wizard again to reconnect.
Step 4 — Check router band and security settings
Wi-Fi band: Brother consumer printers — including DCP, MFC, and most HL wireless models — support only 2.4 GHz.
- Log into your router’s admin page (usually
192.168.1.1or192.168.0.1) - Go to Wireless Settings or Wi-Fi
- Confirm the 2.4 GHz band is enabled
- If both bands use the same SSID, create separate SSIDs (for example
Network-2.4GandNetwork-5G) so you can connect the printer specifically to 2.4 GHz
Security type: Set the 2.4 GHz network security to WPA2-Personal (AES). Brother printers may fail to connect to:
- WPA3 networks
- WPA/WPA2 mixed mode networks
- Networks using TKIP encryption
After changing the router settings, run the Setup Wizard on the printer again.
Step 5 — Use Brother iPrint&Scan
Brother iPrint&Scan is the official Brother application for managing printer connections and settings on Windows and Mac.
- Download Brother iPrint&Scan from brother.com
- Open the application
- Click Add Printer or the printer icon
- The application scans the network for Brother devices
- Select your printer and follow the prompts to install the driver and configure the connection
If the printer is not found on the network, iPrint&Scan offers a USB connection option to install the driver locally, after which you can switch to wireless.
How to verify the fix
- Print a Network Configuration Report: Menu → Print Reports → Network Config
- Confirm the report shows:
- Connection Status: Connected
- Your correct SSID
- An assigned IP address (not 0.0.0.0)
- On Windows, go to Settings → Bluetooth & devices → Printers & scanners and confirm the Brother printer shows Ready
- Send a test print
Frequently asked questions
Brother printer stuck on “Connecting WLAN” and never connects. This indicates the printer can see the network but cannot complete the handshake. The most common causes are an incorrect password, a WPA3 or mixed-mode security setting, or a 5 GHz only broadcast. Verify the password, set router security to WPA2 (AES), and confirm the 2.4 GHz band is active.
Brother printer connects to Wi-Fi but won’t print from Windows. After reconnecting, the printer may have a new IP address. In Windows, go to Devices and Printers, right-click your Brother printer, select Printer Properties → Ports tab, and update the IP address to match what is shown on the Network Configuration Report.
Brother printer drops Wi-Fi connection after every restart. A printer that reconnects after manual setup but drops the connection on restart usually has a changing IP address (dynamic DHCP). Log into your router and set a DHCP reservation for the printer’s MAC address (shown on the Network Configuration Report) to give it a permanent IP.