
A Canon printer that produces wavy, skewed, or misaligned lines — on what should be straight horizontal or vertical lines — has a print head alignment issue. The print head is slightly out of position, causing each row of ink drops to land at a slightly different position than intended.
According to Canon’s official maintenance documentation, print head misalignment is a normal occurrence that develops over time or after the printer is moved. It is corrected through the built-in alignment procedure, not through hardware repair.
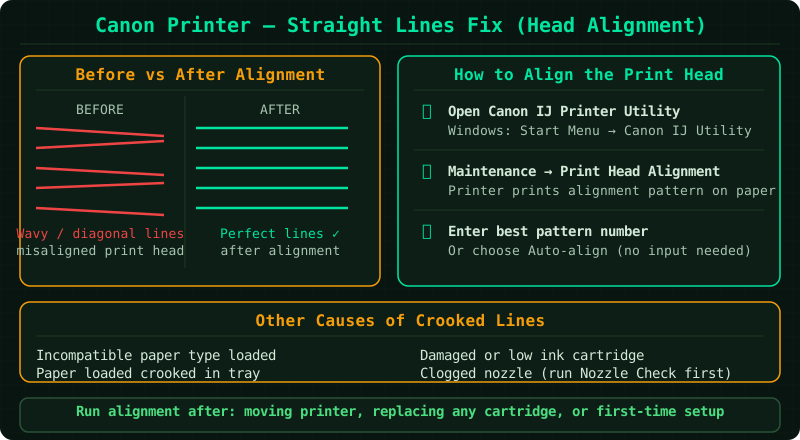
What causes Canon printer to not print straight lines
Lines appear crooked or wavy for specific reasons:
- Print head misalignment — the most common cause. The print head shifts slightly out of calibration over time or after the printer is moved or bumped
- Clogged print head nozzles — ink delivered unevenly from partially blocked nozzles causes lines to appear broken or misaligned
- Incorrect paper type setting — ink spreading behaviour differs between paper types; wrong settings cause ink to bleed or pool unevenly
- Dirty encoder strip — the carriage position strip is smeared, causing incorrect horizontal positioning
- Worn or dirty feed rollers — paper fed at a slight angle causes the printed output to be skewed
How to fix Canon printer not printing straight lines
Step 1 — Run automatic print head alignment
Print head alignment recalibrates the position of the print head nozzles so that ink drops land at the correct coordinates. Canon printers perform this alignment automatically after cartridge replacement, but it can be run manually at any time.
On the printer’s control panel:
- Navigate to Setup (or Settings) → Maintenance
- Select Print Head Alignment
- Select Auto or Start
The printer prints a small alignment pattern, then uses the scanner (on all-in-one models) or an internal optical sensor to read it. The calibration takes approximately 2–3 minutes. Do not open the printer or load paper during the process.
On Canon PIXMA models without a touchscreen, the alignment button sequence varies by model — refer to the quick start guide for your model, or navigate through the Setup button menu on the control panel.
After alignment, print a document with horizontal and vertical lines (a spreadsheet or ruled page works well) to evaluate the result.
Step 2 — Run the print head cleaning cycle
Clogged nozzles deliver ink unevenly — some positions receive less ink than others, causing gaps and irregularities that appear as wavy or broken lines.
- On the control panel, go to Setup → Maintenance → Cleaning
- Select Standard Cleaning
- After cleaning (30–60 seconds), select Print Nozzle Check Pattern from the same Maintenance menu
- Examine the printed pattern — all vertical columns should be complete with no gaps or fading
If columns are missing in the nozzle check pattern, run a second cleaning cycle. Do not run more than two cycles without printing in between — excessive cleaning uses significant ink.
After successful cleaning (all nozzles confirmed), run the print head alignment again (Step 1), as cleaning can slightly shift the alignment.
Step 3 — Verify paper loading and paper type settings
Incorrect paper type settings change how the printer controls ink volume and drying time, which directly affects line quality.
Paper loading:
- Remove all paper from the tray
- Fan the sheets to separate them
- Reload them so all edges are aligned and flat against the tray guides
- Adjust the guides to touch the paper edges without pressing them
Paper type setting:
- In your application, open the print dialog (File → Print or Ctrl+P)
- Click Properties or Printer Properties
- On the Main or Media Type tab, select the paper type that matches what is in the tray:
- Plain Paper for standard office paper
- High Resolution Paper for photo paper
- Matte Photo Paper, Glossy Photo Paper, etc. for photo papers
- Using Plain Paper settings on glossy paper (or vice versa) causes ink to absorb or spread incorrectly, producing wavy edges on lines
Step 4 — Clean the encoder strip
The encoder strip is a thin transparent film inside the printer that tells the carriage exactly where it is as it moves horizontally. Ink splatter or dust on this strip causes the carriage to misjudge its position, printing each row of ink at a slightly offset location.
With the printer off and unplugged:
- Open the top cover to access the interior
- Locate the encoder strip — it is a thin, semi-transparent strip running horizontally behind or alongside the carriage rail
- Lightly dampen a cotton swab with distilled water (not tap water or alcohol)
- Gently wipe the strip from one end to the other — do not scrub or press hard
- Allow it to dry completely (10–15 minutes) before closing the printer and powering it on
- After powering on, run print head alignment (Step 1) again
Step 5 — Run manual print head alignment
If automatic alignment does not resolve the issue — or if the printer model does not have an automatic alignment scanner — use manual alignment.
- Go to Setup → Maintenance → Print Head Alignment → Manual
- The printer prints a series of numbered alignment patterns
- For each pattern group, examine the columns and identify the one that appears most straight and evenly spaced
- Enter that number using the printer’s control panel
- Repeat for all pattern groups (typically 9–12 groups covering horizontal, vertical, and diagonal alignment)
Manual alignment provides finer control than automatic alignment and is used when automatic results are still not satisfactory.
How to verify the fix
- Print a page with a mix of horizontal lines, vertical lines, and diagonal lines — a spreadsheet or technical drawing works well
- Check that:
- Horizontal lines are straight across the full width of the page
- Vertical lines are straight from top to bottom
- Diagonal lines are consistent with no breaks or waviness
- Compare with a previous printed page if available
Frequently asked questions
Canon printer lines are straight at the top of the page but wavy at the bottom. This indicates a paper feed issue — the paper is slipping or skewing slightly as it moves through the printer. Clean the feed rollers (Step 3 of the general Canon troubleshooting guide) and ensure the paper guides are set correctly.
Canon printer alignment pattern itself has wavy lines. If the alignment test pattern prints incorrectly, the issue is more severe — likely a clogged print head or a hardware fault. Run two cleaning cycles before attempting alignment again. If the pattern remains distorted, contact Canon support for service options.
Lines are fine when printing photos but crooked for documents. Different paper type settings use different print modes. Set the paper type correctly in the print dialog for each type of print job. If the issue persists, the print head alignment may need to be set separately for different paper types using the manual alignment procedure.