
A Canon printer that appears ready but produces no output — or prints blank pages — is almost always a software, ink, or print head issue rather than a hardware failure. The printer receives the job, processes it, and moves paper through, but nothing appears on the page.
According to Canon’s official printer troubleshooting documentation, the most common causes are depleted ink cartridges (including non-printing colours), clogged print head nozzles, and stuck jobs in the Windows print queue.
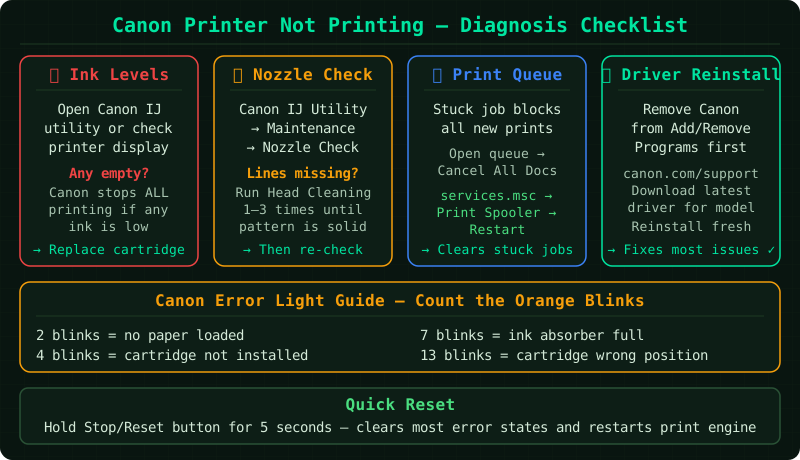
What causes a Canon printer to not print
Canon printers stop printing for a distinct set of reasons:
- Empty or low ink cartridge — many Canon models halt all printing when any cartridge is depleted, even if the empty cartridge is not used for the current document
- Clogged print head nozzles — dried ink blocks nozzles after periods of inactivity
- Stuck print job — a single failed job blocks all subsequent jobs in the queue
- Driver mismatch — an incompatible or outdated driver after a Windows update
- Paper size mismatch — the printer waits for the correct paper if the application and printer settings differ
How to fix Canon printer not printing
Step 1 — Check ink levels
Open the Canon IJ Status Monitor on Windows:
- Right-click the Canon printer icon in the Windows system tray (bottom-right corner)
- Select Open Canon IJ Status Monitor
- Check the ink level bars for all cartridges
Alternatively, on the printer’s control panel, navigate to Setup → Maintenance → Ink Level Information.
If any cartridge shows low or empty, replace it before continuing. Canon’s official documentation confirms that some printer models will refuse to print entirely when even one cartridge is below a minimum threshold — even when printing in black and white.
Step 2 — Clear the print queue and restart the Print Spooler
A job stuck in the queue — from a previous failed print attempt — can block all subsequent jobs.
- Go to Settings → Bluetooth & devices → Printers & scanners
- Click your Canon printer and select Open print queue
- Press Ctrl+A to select all jobs, then press Delete
- Confirm cancellation of all jobs
Then restart the Windows Print Spooler service:
- Press Win+R, type
services.msc, press Enter - Find Print Spooler in the list
- Right-click it and select Restart
After the Spooler restarts, try sending a simple test print — a single page from Notepad works well.
Step 3 — Run the print head cleaning cycle
If the printer was idle for several days or weeks, the print head nozzles may have dried ink blocking them. This produces blank pages or pages with missing sections.
On the printer’s control panel:
- Navigate to Setup or Maintenance
- Select Maintenance → Cleaning
- Choose Standard Cleaning
The printer runs ink through the nozzles for approximately 30–60 seconds. After cleaning completes, print the nozzle check pattern (also in the Maintenance menu) to see if all nozzles are firing correctly. If some nozzles are still missing, run one additional cleaning cycle.
Do not run more than two cleaning cycles in sequence — this consumes significant ink and can damage the print head if the nozzles are physically blocked.
Step 4 — Verify paper and paper size settings
A paper size mismatch between the application and the printer can cause the printer to wait indefinitely without printing.
- Remove the paper from the tray
- Fan the sheets and reload them — misaligned paper causes feed errors
- Adjust the paper guides so they touch the paper edges without bending them
- In the print dialog (the window that appears when you press Ctrl+P), confirm the paper size matches the paper in the tray
- In Windows, go to Settings → Bluetooth & devices → Printers & scanners → click your Canon printer → Printer properties → Paper/Quality tab — confirm the default paper size matches
Step 5 — Reinstall the Canon printer driver
If the previous steps do not resolve the issue, the printer driver may be corrupted or incompatible after a Windows update.
- Go to Settings → Bluetooth & devices → Printers & scanners
- Click your Canon printer and select Remove device
- Go to support.usa.canon.com and search for your Canon model
- Download the latest full driver and software package for your model and Windows version
- Run the installer and follow the prompts — it reinstalls all driver components from scratch
- Reconnect the printer by USB or Wi-Fi when the installer requests it
How to verify the fix
- Open the Canon IJ Status Monitor and confirm all ink levels are adequate
- Send a test print using the printer’s own test page: go to Settings → Printers & scanners → click your Canon printer → Print a test page
- Confirm the page prints with no missing sections, lines, or blank areas
Frequently asked questions
Canon printer is printing blank pages. Blank pages almost always indicate clogged print head nozzles or empty ink cartridges. Run the nozzle check pattern first (Setup → Maintenance → Print Nozzle Check Pattern). If columns are missing from the pattern, run the standard cleaning cycle. If the pattern prints correctly, check ink levels.
Canon printer says it is printing but nothing comes out. This is a print head or ink delivery issue. Run two rounds of cleaning, print the nozzle check pattern, and check ink levels. If ink is present and cleaning does not fix it, the print head may need replacement. Check Canon’s support page for your model — some models have replaceable print heads, while others require a service visit.
Canon printer prints some colours but not others. This indicates one or more cartridges are clogged or empty. Run the nozzle check pattern — any missing columns in the pattern identify the problem cartridges. Replace depleted cartridges or run the cleaning cycle for the affected colours.