
An HP printer that won’t connect to Wi-Fi is one of the most common printer issues reported on Windows. The printer may have connected previously and lost the network after a router change, password update, or network reset — or it may be connecting for the first time.
According to HP’s wireless printer setup documentation, the most frequent causes are temporary network faults that a restart resolves, Wi-Fi band incompatibility (5 GHz only routers), or an incorrect password entered during setup.
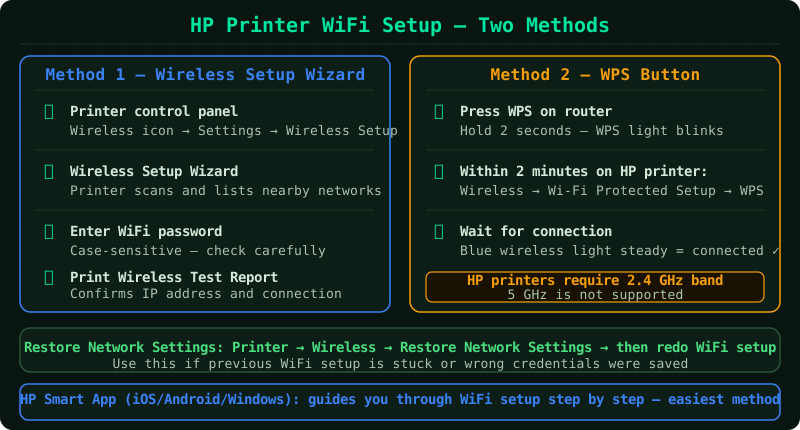
What causes HP printer Wi-Fi connection failures
HP printers communicate with your network through an internal wireless adapter. Connection failures occur when:
- Network credentials changed — if the Wi-Fi password was updated, the printer still holds the old password
- Router was replaced or reset — new routers broadcast a different network, even if the SSID looks the same
- 5 GHz band only — many HP consumer printers only support 2.4 GHz
- IP address conflict — another device on the network took the printer’s previous IP
- Printer wireless adapter needs reset — the adapter can lock after a firmware update or power interruption
How to fix HP printer not connecting to Wi-Fi
Step 1 — Restart the printer, router, and computer
HP’s official wireless troubleshooting guide recommends a full restart of all devices as the first step. Temporary network state issues resolve in most cases without any further action.
- Turn off the HP printer using the Power button
- Turn off your router by unplugging the power cable
- Wait 60 seconds
- Plug the router back in and wait until the internet light is stable (typically 30–60 seconds)
- Turn on the HP printer
- Wait for the wireless light on the printer to stop blinking and stay solid
Once the wireless light is solid blue, the printer has rejoined the network. Try printing a test page before continuing to further steps.
Step 2 — Run the Wireless Setup Wizard on the printer
If the printer did not automatically reconnect after the restart, use the built-in Wireless Setup Wizard to reconnect manually.
- On the printer’s control panel, press the Wireless icon or navigate to Settings
- Select Network Setup or Wireless Setup
- Select Wireless Setup Wizard
- The printer scans for available networks — select your Wi-Fi network from the list
- Enter your Wi-Fi password exactly as it is set on the router (passwords are case-sensitive)
- Wait for the printer to confirm the connection
After the wizard completes, print the Wireless Network Test Report from the same menu to confirm the connection status, signal strength, and IP address.
Step 3 — Restore network settings and reconnect
If the Wireless Setup Wizard fails to find your network or shows an error during connection, the printer’s stored network profile may be corrupted. Restoring network settings clears all saved networks and starts fresh.
- On the printer’s control panel, go to Settings → Network Setup
- Select Restore Network Settings (sometimes called Restore Network Defaults)
- Confirm the reset — the printer restarts its wireless adapter
- Run the Wireless Setup Wizard again to reconnect
This step is particularly effective after a router replacement or if the printer previously connected to a different network.
Step 4 — Check the Wi-Fi band (2.4 GHz vs 5 GHz)
Most HP Deskjet, Envy, and OfficeJet models support only the 2.4 GHz Wi-Fi band. If your router broadcasts exclusively on 5 GHz, or uses a combined SSID where 5 GHz is preferred, the HP printer cannot establish a connection.
To check and separate your Wi-Fi bands:
- Log into your router’s admin page (usually
192.168.1.1or192.168.0.1) - Navigate to Wireless Settings
- Confirm the 2.4 GHz band is enabled
- If both bands share the same SSID, create a separate SSID for 2.4 GHz (for example,
Home-NetworkandHome-Network-5G) - Connect the printer to the 2.4 GHz SSID using the Wireless Setup Wizard
HP LaserJet Pro and PageWide models generally support both bands — check your printer’s specifications if unsure.
Step 5 — Run HP Print and Scan Doctor
If the above steps do not resolve the issue, HP Print and Scan Doctor can identify driver problems, port mismatches, and network configuration errors that are not visible through the printer’s own setup menu.
- Download HP Print and Scan Doctor from support.hp.com
- Run the file — no installation required
- Click Start and wait for it to detect your HP printer
- If the printer is not detected, click My printer is not listed and enter the printer’s IP address (found by printing the Wireless Network Test Report)
- Select Fix Printing and follow the prompts
The tool reinstalls the wireless driver, resets the port assignment, and re-establishes the connection between Windows and the printer.
How to verify the fix
After reconnecting:
- Print the Wireless Network Test Report from the printer’s control panel (Settings → Print Reports → Wireless Test Report)
- Confirm the report shows: Pass for all tests, the correct SSID, and an assigned IP address
- On Windows, go to Settings → Bluetooth & devices → Printers & scanners and confirm the HP printer shows Ready
- Send a test print
Frequently asked questions
HP printer connects to Wi-Fi but won’t print. A connected printer that won’t print is usually an issue with the printer’s IP address changing after a router restart. Check the IP address in the printer’s Network menu and compare it to the port listed under Printer Properties → Ports in Windows. Update the port if they differ, or configure a static IP address in the router.
HP printer shows connected on the printer screen but offline in Windows. The printer’s wireless light and screen show the Wi-Fi connection. The offline status in Windows is separate — it reflects whether Windows can communicate with the printer at its current IP address. Run HP Print and Scan Doctor to resync the printer’s IP address with Windows.
Wi-Fi password was changed and now the printer won’t connect. The printer stores the previous password. Run the Wireless Setup Wizard, select your network, and enter the new password. The printer will not prompt automatically for a new password — you must initiate this manually through the wizard.