
A printer that reports a paper jam when no paper is visibly stuck is experiencing a sensor error, not a mechanical blockage. The jam sensor — a small optical or mechanical switch in the paper path — is triggering without paper actually being caught in the mechanism.
According to HP’s official jam troubleshooting documentation, false jam errors are most commonly caused by small paper fragments left from a previous jam, debris on the paper feed rollers, or a firmware error that misreads the sensor state.
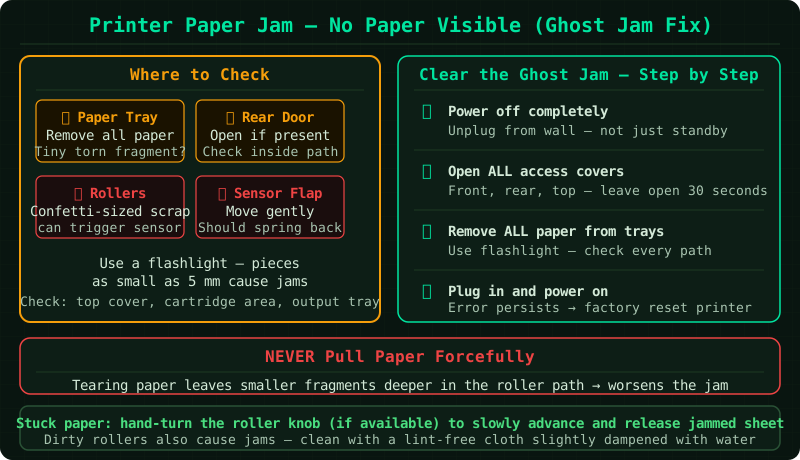
What causes a false paper jam error
The jam sensor works by detecting whether the paper path is clear. A false error occurs when:
- Paper fragment remaining — a small piece torn from a previous real jam is lodged near a sensor
- Dirty or glazed feed rollers — debris on the roller surface causes it to slip, triggering the jam sensor without paper moving
- Misaligned paper in the tray — paper loaded at an angle skews into the sensor zone
- Firmware bug — some printer models have known firmware issues where the jam sensor state is not properly reset
- Foreign object — a small piece of tape, label backing, or staple inside the paper path
How to fix printer showing paper jam with no paper
Step 1 — Power cycle the printer completely
A power cycle clears the error state stored in the printer’s memory. Unlike pressing the cancel button, which acknowledges the error without clearing the sensor state, a full power cycle resets all internal systems.
- Press the Power button to turn the printer off
- Unplug the power cable from the back of the printer
- Wait 60 seconds — this ensures the printer’s capacitors fully discharge and the memory clears
- Plug the power cable back in
- Turn the printer on and wait for it to complete its startup
If the jam error does not appear after the power cycle, the error was caused by a temporary sensor fault. If it returns, continue to the next steps.
Step 2 — Inspect all paper path access points
Even a small fragment of paper — 1–2 cm — can trigger the jam sensor. Paper tears are common during real jam clearing events.
With the printer powered off:
- Open the front access door (where you access cartridges or the paper path)
- Open the rear access door if your printer has one — often a panel that snaps off the back
- Remove the duplexer if present (a module that enables double-sided printing, usually clips onto the rear)
- Use a flashlight to inspect the rollers, guides, and sensor areas
- Look for any paper fragments, torn edges, label backing, or other debris
- Remove anything you find using tweezers or by hand — do not use scissors inside the printer
On HP printers, also check the area above the cartridge carriage — paper occasionally tears and lodges in this area without being visible from below.
Step 3 — Clean the paper feed rollers
Rollers that are glazed with ink residue, paper dust, or general debris can slip on the paper surface. When a roller slips, the printer detects that paper is not moving normally and reports a jam.
- Turn the printer off and unplug it
- Open the paper input tray and locate the feed rollers (usually visible at the back of the tray slot — small cylindrical rubber components)
- Dampen a lint-free cloth with distilled water — do not use tap water (minerals leave residue), cleaning sprays, or alcohol
- Press the cloth gently against a roller and rotate it by hand to clean the entire surface
- Repeat for each visible roller
- Allow the rollers to dry fully (10–15 minutes) before powering the printer back on
Step 4 — Reload paper correctly
Incorrectly loaded paper skews as it enters the feed mechanism, triggering the jam sensor before the paper reaches the print zone.
- Remove all paper from the input tray
- Fan the sheets — hold one end and let the pages fall slightly to separate them. Static electricity between pages causes double-feeding, which triggers jam sensors
- Tap the stack on a flat surface to align all edges
- Reload the paper flat against the back of the tray
- Adjust the width guides so they lightly touch both sides of the paper stack — not pressing in, not loose
- Adjust the length guide to meet the back edge of the paper stack
Only use paper within the printer’s supported specifications. Paper that is too thick, too thin, or curled from humidity can trigger false jam errors.
Step 5 — Update the printer firmware
HP, Epson, and Canon have released firmware updates that correct known sensor misreporting issues on specific models.
HP printers:
- Open HP Smart on Windows or the printer’s control panel
- Go to Printer Settings → Printer Information → Update
- Install any available firmware update and restart the printer
Epson printers:
- Download Epson Software Updater from epson.com
- Run the updater and install any firmware updates for your model
Canon printers:
- On the control panel, go to Setup → Firmware Update
- Follow the prompts to check for and install updates
How to verify the fix
- Load 5–10 sheets of clean, undamaged paper into the input tray
- Send a test print from Windows: Settings → Bluetooth & devices → Printers & scanners → click your printer → Print a test page
- If the test page prints without a jam error, the issue is resolved
Frequently asked questions
Printer shows paper jam immediately when powered on, before any paper is loaded. This confirms a sensor fault rather than actual paper. A fragment is likely lodged near the sensor. Inspect all access points with a flashlight and check for debris even in areas that seem inaccessible.
Printer cleared the jam error once but it keeps returning. The feed rollers are likely worn or dirty. After cleaning (Step 3), test with a small batch of paper. If the error returns consistently, the rollers may need replacement — check your printer manufacturer’s support site for roller replacement guides or service options.
Paper jam error on a brand-new printer. A new printer with a jam error has likely experienced packing material left inside the paper path. Open all doors and remove any foam, tape, or cardboard that may have been left from shipping.